


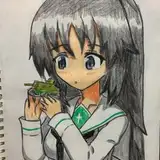
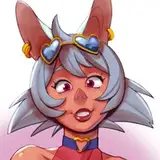
ń╗ŐňŤ×Ńü»ŃâČŃéĄŃâĄŃâ╝ŃüźŃéłŃéőŔ¬┐ŠĽ┤ŃüźŃüĄŃüäŃüŽŃüíŃéçŃüúŃüĘŔę│ŃüŚŃüĆŃÇéšë╣ŃüźÚŤúŃüŚŃüäŃüôŃüĘŃü»ŃüŚŃüŽŃüäŃüżŃüŤŃéô´ŻŚŃüíŃü¬Ńü┐ŃüźŔéîŔë▓Ńü»ŃüíŃéçŃüúŃüĘŠÜŚŃéüŃüźňíŚŃüúŃüŽŃüŐŃüĆŃüĘŃÇÇŃüôŃü«ňżîŔíîŃüćŔ¬┐ŠĽ┤ŃüžŔë»ŃüäŠäčŃüśŃüźŃü¬ŃéŐŃéäŃüÖŃüäŃÇé
I talk about adjusting by layer in detail, I don't do a difficult way.haha By the way, painting a bit dark color on skin, it tends to be good to adjust by layers.
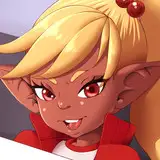
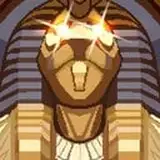
ŃéşŃâúŃâęŃé»Ńé┐Ńâ╝ŃüźŔŽćŃüäšä╝ŃüŹŃéźŃâęŃâ╝(šÖ║ňůë)ŃüžŃüôŃü«ŃâČŃéĄŃâĄŃâ╝ŃéĺňÉłŠłÉŃüŚŃüŽŃÇÇŃâęŃéĄŃâćŃéúŃâ│Ńé░ŃüźŔë▓ňÉłŃüäŃéĺňŐáŃüłŃéőŃÇé
Putting this layer on the character layer in color dodge(glow), it adds color to the light.
ŃüôŃüôŃüžŃâĽŃéúŃâőŃââŃéĚŃâąŃüŚŃüŽŃééŔë»ŃüäŃüĹŃüęŃÇÇŃééŃüćŃüíŃéçŃüúŃüĘŔë»ŃüäŠäčŃüśŃüźŃüŚŃüčŃüäŃÇé
I think it's okay to finish in this time, but also I want to make it better a bit.
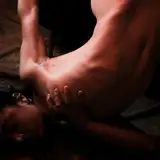
ŃüôŃü«ňÉłŠłÉŃüĽŃéîŃüčŃéşŃâúŃâęŃé»Ńé┐Ńâ╝ŃâČŃéĄŃâĄŃâ╝ŃéĺŃé│ŃâöŃâ╝ŃüŚŃéČŃéŽŃé╣Ńü╝ŃüőŃüŚ(100px)ŃéĺŠĆĆŃüĹŃüŽŔ¬┐ŠĽ┤šöĘŃü«ŃâČŃéĄŃâĄŃâ╝ŃéĺńŻťŠłÉŃÇéńŞ╗ŃüźŃé│Ńâ│ŃâłŃâęŃé╣ŃâłŃü«Ŕ¬┐ŠĽ┤ŃüźńŻ┐ŃüćŃüôŃüĘŃüîňĄÜŃüäŃÇé
Copying compositing the character layer, and doing Gaussian blur(100px) to the layer. I usually use it by change the contrast.
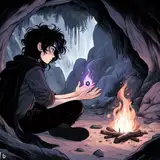
šžüŃü«ŃüŐŠ▒║ŃüżŃéŐŃü«ŃâĹŃé┐Ńâ╝Ńâ│Ńü»ŃÇÇšä╝ŃüŹŔż╝Ńü┐(Ńâ¬ŃâőŃéó)ŃüžŃé│Ńâ│ŃâłŃâęŃé╣ŃâłŃéĺŃüĄŃüĹŃüŽňŐáš«Ś(šÖ║ňůë)ŃüžšÜ«ŔćÜŃéĺŔ╝ŁŃüäŃüŽŃüäŃéőŠäčŃüśŃüźŃüÖŃéőŃÇéŃü¬ŃüŐŔ¬┐ŠĽ┤ŃâČŃéĄŃâĄŃâ╝Ńü«ÚÇĆŠśÄň║ŽŃü»šë╣ŃüźŠ▒║ŃüżŃüúŃüŽŃüŐŃéëŃüÜŃÇüŔë»ŃüäŠäčŃüśŃüźŃü¬ŃéőŃüĘŃüôŃéŹŃéĺŠÄóŃéŐŠÄóŃéŐŃÇéŃüčŃüżŃüźń╗ľŃü«Šľ╣Š│ĽŃéĺŔęŽŃüÖŃüôŃüĘŃééŃüéŃéőŃÇé
My pattern is doing liner burn for changing the contrast, and doing add(glow) for glowing the skin. As for the transparency of the adjusting layers, I don't decide some value, keep to try any one untill feeling good for me. But aso I sometimes try to do other compositing.
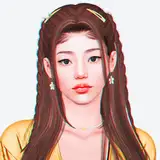
ň«îŠłÉ´╝ü Finished!


