Project Management: a breakdown of our workflow
Added 2019-01-16 03:19:21 +0000 UTC“I’ve got a great idea for a game! Now what?”
One of the earliest hurdles that come up during creative work is the step that bridges “I know what I want” and “now I’ll start doing it”. Especially with something as large as games, there’s just too much to do. What seems like simple tasks can be endlessly broken down and micromanaged as tiny tasks that will stretch infinitely into the horizon.
Every individual and team has their own ways of tackling project paralysis. These can range from being as simple as having post-it notes, or as complex as a project management software. This is just how we do it — hopefully it helps you find something that works for you!
Breaking Down a Project
It’s hard to work towards something that’s not clear, or well defined. Before we start on a new part of snacko, a main mechanic, or any system, we have a quick meeting to discuss what we want. We’ll write down notes in bullet points, and reorganize them later for our own use if necessary. Below, I’ve written up an easy 6-step guide on how we start tackling our projects:
#1 — Define the milestones
For example: Playable Demo, Combat System, Dungeon Design, Monster Designs, UI/SFX/VFX, Bugs and Polish, Testing, Pre-Launch, Launch. Not only will these milestones help you track your overall progress, they will also allow you to give a rough estimate for development time.
Applying for funding or talking to a publisher will also require you to be able to talk about your development timeline.
#2 — Define the first milestone
What would it mean for you to reach that goal? For a playable demo, that could be a working combat system, one or two NPCs to talk to, two varieties of enemies, and a simple dungeon map. List these out in an easy to read format (like a list), and keep it handy so you can always refer back. This will also help you keep on track and prioritize your work to prevent scope creep.
#3 — Break the milestone into weekly chunks
Block out a reasonable time that suits your work habits, schedule, goals, etc. For us, we wanted to finish it by GDC, — which at that time — meant 13 weeks. We eliminated things we felt were not essential to a vertical slice of our game, and listed out what we thought would best represent the “key mechanics” of our game. Following our example from earlier for an adventure game demo, this could look like:
- Week 1: player movement code, player walk and idle sprites, block out starting area
- Week 2: player attack system, HP, rough UI, player attack sprites
- Week 3: enemy AI system research, first pass enemy behaviour, enemy movement sprites
…and so on. You can adjust these according to your pace and if something comes up during development as the project goes on.
#4 — List out your tasks
Weekly tasks go into their own page (we use Notion, more on this later!), tasks that we know right off the bat need to be done, but not critical for our goal this week are put into a separate list or page. Things we’d like to be in the demo but probably can’t implement, are put into a wish list. How small to break up the individual tasks is up to you, or what fits the context. Sometimes, I have something as small as “make this UI graphic”, because I know it will take me a long time to research, design, and implement. Other times, I’ll have a large task like “texture all interior objects”, but have a checklist within the task to help me keep track of individual assets.
#5 — Execute them!
I like putting my tasks in an order that sort of groups them together so it’s easier to get a sense of what needs to be done, but I’ll usually work on them out of order. Things like, “today I feel like doing pixel art”, or “today I feel like drawing” will influence what I will work on. When there are certain tasks that need to be done before further tasks can be started on, or if there are assets my partner needs in order to help visualize his code, I’ll try to get those done at the beginning of the week.
#6 — Rinse and repeat
Repeat from step 2, except now move onto the next milestone! Remember, things like planning, reviewing your work, and other managerial duties are also “work”, even if they’re not development time. Account for those in your weekly task budget. You’d be surprised how long it could take to take beauty shots or set up GIFs for a Twitter post! This is still working on your game!

Bonus Tip: Track your time! Unfortunately, Notion doesn’t have a way to track time worked on an item (HH:MM), but their support was kind enough to contact me and say it was something they’d like to implement in the feature. For now, I track using minutes with the Number property, so I can get a sum of the amount worked per week. Not only is this helpful seeing how much you’ve actually worked, it’s also helpful in estimating future tasks and adjusting workloads for upcoming milestones.
Managing Your Tasks
There are so many project management and task management systems out there it’s impossible to list them all. From popular ones like Jira, Trello, and your good old pen-and-paper, to new and upcoming services like Airtable and Notion, there are lots of websites and methods to explore and try for free. The one that we ended up sticking with was Notion.
Of course, you can use a regular spreadsheet, but having an easy to understand interface, mobile support, and other features like shareable pages, were why we ended up using Notion in our daily work flow. We use it to keep track of quite a few things:
Our tasks
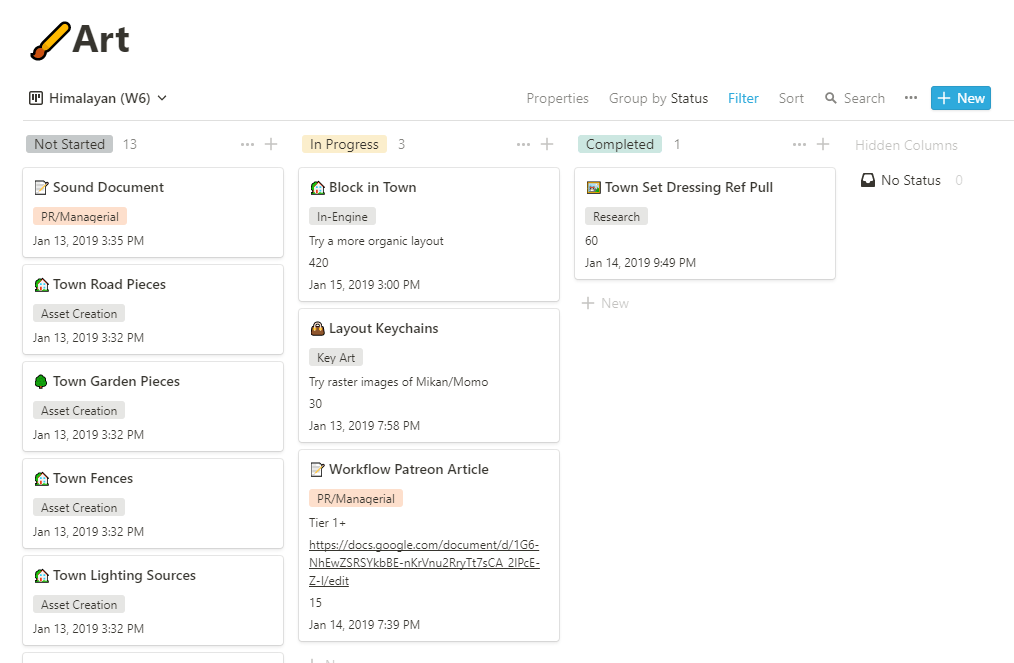
- Remember how I said we broke our tasks into weeks? We have a tag for each entry for the week number. This allows us to create new views, or new saved categorized views, for each week.
- In Notion, and in many other similar programs, you can add properties to each tasks. I like to put “categories” on my tasks: modelling, key art, bug fixes, etc. Which means if I ever wanted to just have a page with all the bugs I needed to work on, I could do that, too! Other fields include “time spent”, “progress notes”, and “last modified” (for when a task is completed).
- I have 3 views — or pages with specified filters and data shown in a certain type — the current week in kanban, an “archive” as a table view that shows last week’s completed items, and “view all” also in table view with everything sorted by completion status, then week, then alphabetical order. This could vary from person to person; my partner has one for “open items” for tasks that still need to be done, regardless of week, and “unplanned” for tasks that need to be done for the milestone, but not yet planned into a week.

Yes, we named our weeks after cat breeds.
Dates
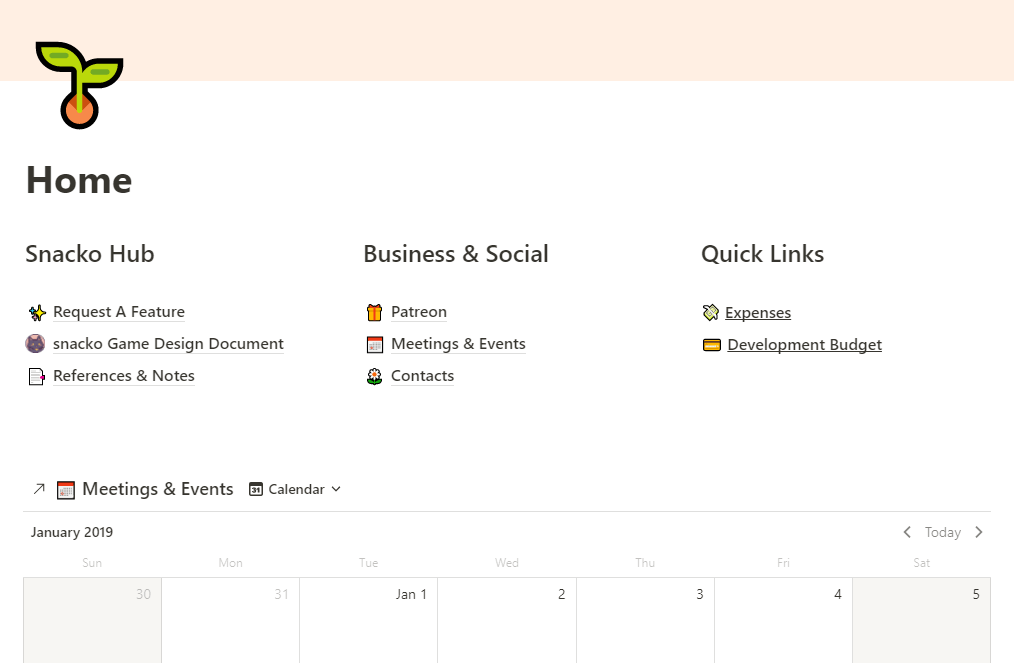
- You can create a new calendar view with existing data in a page, or embed a blank calendar in an existing page with it’s own data. I embedded a calendar into the “home” page of our workspace; this page has quick links to things like meeting notes, external documents, and other handy portals.
- Sometimes I’ll have a great idea for Twitter, or Patreon, but not have the time to do it, or it’s not the proper time to post. When that happens, I make sure to make a note of it on the calendar with the idea for a date that I’d like it to go live. We also use this calendar view to schedule our meetings, and other dev-related events.
Game Design Document
- This is something that has a slightly different definition depending on who you ask, but it’s essentially a big file with all the information of your game with it, usually directed at the internal team. So, instead of trying to sell this to consumers, the purpose of this document is to be more pragmatic about what the game is about, who the target is, and the specifics of mechanics. This way, when you have to bring on extra help, or trying to clarify a mechanic to potential publishers, everyone know exactly what’s going on. There are some GDDs that are downloadable for you to read, like Diablo, or Bioshock.
- Here, we have our GDD in it’s own page with subpages, which means we can share the entire GDD publicly through a link or email invite, without exposing the rest of our workspace. This can be viewed through the app, or just as a regular web page in a browser. The ability to put inline tables, calendars, kanban, and other data types is helpful. Here, I’m using a table to keep track of all our crops and their data:

Keeping track of miscellaneous things
- Asides from standard development stuff, I also like to keep a list of contacts in Notion with a table. Since you can link to any type of data within your workspace, it’s easy to attach a contact to a task, or a calendar event. Tags, categories, and filters also help with getting the list just how you want it.
- Anything that’s a list, is better kept in Notion. I keep track of Patreon deliverables, due dates, emails I have to reply to, and other things in their own section. The ability to move chunks of text around or turning them into to-do items is handy as well for meeting notes. Separate from the team workspaces, there is also a private workspace where you can freely create pages that are only visible and accessible by you. Sometimes, I use this
Final thoughts
What was written above was just an outline of how we like to work. It’s definitely not the “correct” or “only” way. Don’t be afraid to blow through a couple of different systems until you find one that suits you. It may be that you have to combine a couple of different methods to meet your individual needs. Asides from all the Notion tasks and lists, I still have a personal, physical planner where I keep track of major weekly and monthly deadlines.
Sometimes, just the act of planning something will help organize it in your head!