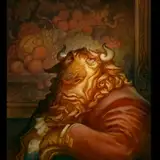

Today I have a finished painting and Process Guide from the Dungeon Master Series for you. The image was drawn in traditional pencil and then colorized in Photoshop using a Wacom Intuos tablet. I used the "Cycle" method on the painting, which I have covered over the past several months in the Tutorial Tier PDFs.

In the above Process Guide, you can see that it all began with all transparent layers, first to add value over the drawing, then to establish color. In stage 1 I use multiply layers to add warm value to the shapes. In stage 2 I add transparent color before using lower opacity normal layers to slowly build up the paint to the point where the characters and forms take on a more dimensional look. I don't rush this section because it takes a while to get dimensional shapes to look right, and if you rush it and get it wrong, it looks really wrong. Finally, in stage 3, with the forms mostly established I start to delve into more detail-focused layers and paint with much smaller brushes, to add detail to the scene.
Stage 3 is also where I begin to work through my cycle of lighting an area, adding color to it, rendering it, before repeating the cycle several times to achieve a nuanced and highly rendered-look to the characters and forms.

In the above preview image, you can see that before I delved into the pencil drawing, I started with some limited reference, a color comp, and a loose ink sketch. I cannot overstate how important this kind of planning is for a successful outcome. When I was getting started in this career, the older illustrators told me that this kind of planning and forethought is what separated professionals from amateurs in this industry.

I hope you enjoyed this one! It was a ton of fun to work on and I'm already looking forward to the next one in the series...
-jg
Justin Gerard
2023-04-04 12:21:29 +0000 UTCDESHEN GONG
2023-04-04 08:52:29 +0000 UTCJustin Gerard
2023-03-09 12:56:27 +0000 UTCNicolò Rigobello
2023-03-09 09:50:48 +0000 UTC