I had a productive weekend, and pushed the End of Content on Morningstar to Day 27 (the first release ends midway through day 16). 2nd Act's always going to be a special one; Act 1 defines the world and the setting, Act 2 gets to set up some of the central themes and plots. It'll end on Day 35, so progress is going well.
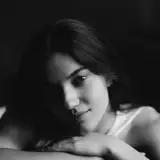
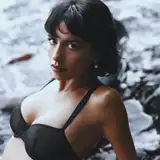
The video's for an optional Day 24 event; it's what I'd call a scene setting shot. I wanted to establish where Katie lived, and the mood in the city.
I haven't done any workflow breakdowns for a while, so... let's do that.
Background came out of MidJourney. I considered rendering it in Daz, but... I'll only use this shot once, and it seems a waste.

That got me a pretty nice background, but it's still got some AI distortion. You can nudge it into more details by remixing it and requesting more details , which got us a somewhat cleaner image.

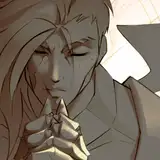
Next, the character. He's rendered in Daz; I basically did a rough pose to get him at more or less the same camera angle, then used big mesh lights to do the orange/teal lights I wanted to replicate.

Now, a sensible person would have put the two together in Photoshop, and called it done. It's a 2 two line scene, but... I actually really liked how it looked, and decided what I could do better. On to After Effects!
Okay, there's a lot of stuff going on here, so let's break it down.
Step 1. Import the images.
I'm marking the images as '3D objects'. The character is placed at a distance of 0, and the background at 1000 units away (then scaled it up so it fit the whole screen). This is going to let me add Parallax Depth to the scene.
If you imagine driving, and looking out of the window, you'll notice that objects in the foreground move faster than ones further away; this is the parallax effect, and our brain uses it to detect size and distance (always useful when you need to know how far away and how big that cave lion in the distance is). We can use that same effect into tricking the eye into believing something is 3D even if it's just two static images.
Step 2: Add complexity
The two images themselves are honestly enough, but since we're in AE anyway, let's add a little more complexity.
I love using Smoke Overlays (where someone's gone through and filmed actual smoke against a black background); they provide a nearly free way to add subtle touches to a scene, breaking up the lack of movement. 
The trick with smoke is to make it subtle. It's drawn at 20% opacity, and then masked (constrained) to only render on the bottom right hand side of the screen. If you look at the video you can probably notice it, but only if you're looking for it.
I also added a slight depth of field blur to the image, so we're clearly making MC the focal object in the scene, and added a little bit of light rays to get animation in the scene.
Not anywhere near as complex as the big cutscenes I'm working on for Day 28, but it looks nice. Hopefully that was interesting to some of you; as always, if you have questions or feedback, let me know in the replies!
Bruce Mellish
2023-10-23 09:52:59 +0000 UTCPax
2023-10-23 09:32:06 +0000 UTCDroid Productions
2023-10-23 09:18:15 +0000 UTCPax
2023-10-23 09:10:32 +0000 UTColiveron
2023-10-23 08:10:22 +0000 UTCBlacklabyrinth
2023-10-23 04:47:37 +0000 UTCIridium - Brian
2023-10-23 00:09:20 +0000 UTC