In this article, we will continue from the previous article to explain how to draw eyes 'sideways ver'.
Table of Contents
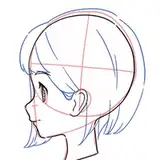
1.Let's compare the front and side views.
2.The difference between eyes seen from the front and from the side
3. Be aware of the plane

In the frontal view, the eye socket is visible, but in the side view, the eye socket is hidden and the roundness of the front of the eyeball (around the black eye) is easier to capture.
The order of drawing is the same as for the front, but it is easier to use pentagons or triangles instead of hexagons for the bite shape.
(This is because one corner corresponds to the eye socket, which is then hidden.)


The eyes are mainly composed of the iris, cornea and pupil, and it is easier to capture the three-dimensionality of the eyes if you draw them with these three points in mind.
Also, eyelashes should be drawn so that they spread out in all four directions to create a three-dimensional effect! The pupil is slightly hollowed out, like the bottom of a plate in extreme cases. This makes the pupil look a little inward and gives a three-dimensional effect when the angle is right.
If you have trouble getting a good sense of it, draw a black circle in the centre of the paper plate with a magic marker and look at it from different angles!
Also, as shown in the diagram below, if there is reflected light near the outline of the pupil, it will look like that. Let's put light with a lower brightness than the highlights.


The pupil is, as we know, circular in shape.
When you look at circular objects like this from an angle, such as diagonally or horizontally, the diameter of the circle on the same line as the direction (depth) of your eyes appears to change. This means that the closer the angle between the object and your eye is to parallel, the narrower the diameter width appears, and if the object is flat and thin, such as paper, it will eventually look like a straight line drawn with a pen.
With this knowledge, it is recommended to actually observe circular objects, as this will improve your understanding and make you more knowledgeable!
Also, you cannot see the silhouette of the cornea from a nanametric or frontal view, but the more you turn sideways, the easier it becomes to see.

The eyes, as well as other parts of the body, create depth in the same way. The overall silhouette of the eyes, the width of the eyebrows, etc... They change along the unevenness of the face.
The face is not a flat surface like a single sheet of flimsy paper. In extreme cases, it is a three-dimensional object made up of a number of sheets of paper, as in 'side paper', 'full paper' and 'top paper'.
It is quite natural, but when you compare the face between the cheekbones and ears, the so-called 'cheek' area, and the face near the nose, the direction of the palm of your hand changes, doesn't it?
This is because the direction of each side is different.
Once you are aware of these faces, imagine a vertical line from the centre of the face.
If you look at the vertical line with your eyes, you can see the face as it is, without compression. Other surfaces are oriented differently to the eye, which creates depth.
Here we see again a comparative image of the front and side of the eye.

The eye socket is the part that is on the full surface, while the eye socket is the part on the side.
When viewed from the side, the outer corner of the eye is on the vertical line of the eye, so the distance from the outer corner of the eye to the pupil maintains its original width.
However, when viewed from the front, the distance from the outer corner of the eye to the pupil appears somewhat shorter.
With real human eyes like ours, we hardly notice any difference visually, but eyes that are greatly exaggerated, such as those of cartoon and comic characters, can have a greater depth to them.
This level of awareness is not necessary when actually drawing, but it is recommended to have this knowledge as it makes it easier to grasp the three-dimensional effect.
Finally! We have also created a drill sheet for practice!
It's a sheet that allows you to trace and copy together.
If you find it a bit difficult to observe and compare drawings, please download and use it!

Please look forward to the next lecture!