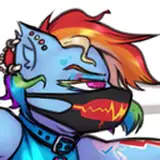
Colored w/ steps
Added 2023-09-01 03:23:05 +0000 UTC
alright here we go
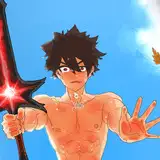
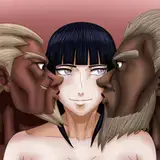
- 1. I select outside the lineart, invert selection, then fill with my color of choice. For these orcs the primary hue is green, which I've warmshifted since these are warm blooded flesh and blood beings. Set protect alpha/lock transparent pixels here and save yourself the pain of manually staying within lines.
- 2. Based on the fill color, I choose a slightly darker, warmer color to use as a gradient. This gradient will go on "warm" parts of the body. In my head this means both temperature and erotic level. The torso is generally the warmest part of the body, so it gets a gradient. The hands can be a very sensual part of the body, so they get a gradient. Sometimes I do a double gradient, and reduce the radius slightly with the second darker gradient.
- 3. For blocking out areas that are distinct from other areas, in this case all armor, I start a new layer and paint above the base color layer. Don't worry about going outside of lines, and if you have (mostly) clean lineart, the fill tool can speed up this process quite a bit.
- 4. Once all of the armor is blocked in, I set the layer to clipping onto the base layer. Now you don't see all of the ugly outside lines, though they are technically still there unless you choose to merge this layer down onto the base layer.
- 5. Slightly rotated the whole character here to make him look more planted. To distinguish the plates from the leather straps, I make a new layer, set to clipping again, and paint in red/brown where I want it. A textured brush can work really well for these inorganic objects. I also very gently added in some warm shadow colors, and about 50% of the work is done at this point.
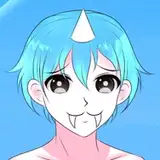
- 6. I make a quick pass to start establishing more highlights. On the wheel, I move the green slightly yellow and slightly white, then test and adjust as necessary. This color goes on all surfaces that are facing the imagined light source, and is more intense on parts closer to said source. Remember, light dissipates as it travels, so objects further from the source receive less light. Highlights can be emphasized with shadow, so I add more of those too.
- 7. I wanted a somewhat glossy effect for this skin, so I pushed some of the values further and continued to refine and paint surfaces. This is where I can establish planes of the body more clearly from each other.
- 8. There is a very small difference that had a profound effect for me between this image and the last. I've added a slight light glow coming in from the left that effects the leftmost pec, abdomen and arm. I paint within the darker area with a slightly lighter warmer color, leaving a border all around.
- 9. This is what my darker shadows look like before they're finished. I use a bright color, put everything I've done thus far into a folder, and clip the color down onto the folder. I'll use this color to mark out clear cast shadows, which occur when one object is blocking the light source from reaching another object, such as the armor resting on the legs. This is where you'll engage and train your 3D thinking.
- 10. I set that red to multiply, duplicate it, set the duplicate to add glow, and aim for a decent contrast between the two. Once I have that, I shrink the line width of the add glow layer until there is a small dark border, merge them, set that new layer to "brightness to opacity", which will turn it gray. I then set that gray layer to "convert to drawing color" while my main color is a dark desaturated red. I'll play with the opacity again to make sure it doesn't look too strong or weak.
- 11. Blur tool time. My goal is to maintain some sharpness, and blur where there is a large stretch of skin. I ease the blurring in specific areas, and the reasoning is a little difficult to explain, but if you zoom and look you'll likely pick up on the pattern.
- 12. After all blurring and further refining, the character itself is finished.
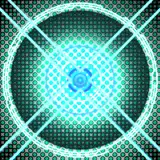
- 13. Backgrounds are anything but my strongsuit. I've liked these simple graphic shapes for a while now, and usually a cire or rectangle works depending on the composition.
- 14. Outline added and final adjustments made. The shadow is usually a duplicate of the base color layer squished down with the transform tool, and set to a dark cool color with a slight gaussian blur. And finally, a high res export made just for your eyes.
Hope this helps in some way!