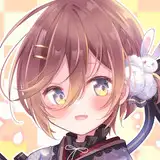
![[Making process] Blue Archive two sculptor's Toki bunny](https://img5.saketami.com/storage/4/dy/kw/9a2cd0-019e8e83-8e69-760b-9f3b-7c75bee9726c.jpg)
It has been a while since I have written an article about my work.
This time, I would like to report on the toki of Aoki Sougetsu and French Doll, both of which I created in the recent past.
Both of them had a small number of parts, but each of them had some difficult points, so I would be happy if I could give some hints to those who are going to make them in the future.
If you are interested in toshi's bunny toki, which I made as an example before, please check out my previous postings.
┃Surface treatment - Dryfit
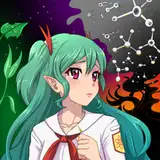
First, let's take a look at Aoki's Toki. The number of parts is a modest 39, and the parts are well-pulled out and the color scheme is simple. The parts are precisely divided, so there is no need for complicated masking.
 Personally, I had the impression that the kit was just the right level for someone who feels a bit out of the novice level.
There is nothing to write about the surface treatment (sanding) as there is nothing to pay attention to, but the shaft connecting to the headset microphone was thin and seemed to break, so I replaced it with a brass wire.

These simple thin parts are easy to break...
There are no other parts that were detailed up other than here, so it was really easy to surface and assemble.
 ┃About Painting
To be honest, I have no trouble at all with the paint job, as the color scheme is simple as mentioned above. However, since this was a commissioned product, we exchanged opinions with the client regarding the color of the blonde hair, and ended up with the color of the finished product. This is how we prepared the initial materials before painting.
 At this time, we prepare original illustrations, fan art, and official photos as reference materials.
The hair color of Toki by toshi, which we created as an example in the past, was ivory, but we added yellow, brown, and orange to lighten the color according to the client's request.
It was a little difficult because we had to match the hair color in detail.
At first, I asked for the client's opinion on the hair color that was closer to toshi's, and then I adjusted the color from there.
 Once the hair color was decided, blue highlights were added.
If you get ahead of yourself and start working on details like this before the hair color is decided, you will end up having to make corrections that were not originally necessary. If you are taking on commissions, please check with the client before proceeding to avoid unnecessary revisions.
 In the video, it is cut as much as possible, but the process for adding this mesh color is exactly the same as the work done in Frenchdoll's bunny Toki video.
Masking is just done with spirit.
 The color of the braid is simply painted with a brush using enamel paint and then wiped off and shaped with a correction.
Masking is more inefficient here, so work with a brush.
 Incidentally, the mesh color of this back hair comes off with the masking when painted with enamel (which actually happened), so it is easier to airbrush paint it with lacquer.
 If there are no problems with the combination, protect it with lacquer clear to prevent it from peeling off.
 If you are in a hurry and dilute the clear too much or spray too much at once, the mesh color will melt and it will be disastrous. To prevent this from happening, spray three times and let it dry before applying gloss coat. Do not be in a hurry to do anything.
I remember a comment on Youtube, “Why are you masking such a detailed part (about the one point color part of knee socks)? Can't you just paint it on with a brush?”
 I could certainly use brush paint, but I guess this depends on the situation.
Personally, I use masking if it is more efficient and brush painting otherwise.
In addition, the entire knee-soled part had already been matte-coated, so it was difficult to apply enamel brushes to it. The garage kit production itself is the ultimate in inefficiency, so it is a real pleasure to think about how to maximize the efficiency of the work in a flexible and flexible manner.
┃Eye painting (face work)
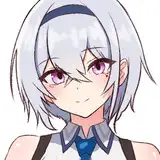
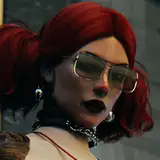
Decals are included in this kit, but they are made to look like droopy eyes. I felt that Toki's eyes had a long, slanted look, so I decided to work in that direction.
However, I also wanted to add a cute image to the face, so I created the facial expression with only three slightly thicker, wider, and more spaced-out shy lines.
If you want to create a cool image, you can either use no shy lines or draw fine lines.
The eye contact is the part that was exquisitely difficult to achieve...
 Once the work has been done up to this point, the rest is like a digestive game, so add blush color (eyes, chin, lips), eyebrows, matte, and finish by rushing all the way through to the finish line.
 And just when we thought we had completed, checked, shipped, and delivered the product safely, for some reason only the bunny ears were damaged and had to be repaired... but that's another story...
We are always prepared to repair such damage, and although we may have to bear some costs, we will work responsibly to ensure that the product is delivered safely until the end of the process.
┃Surface treatment - Dryfit
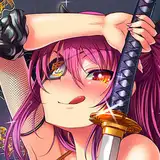
 First of all, the number of parts is relatively small (35 parts), but the difficulty level of assembling and painting is extremely high just because the number of parts is small.
It is a little difficult to describe, but the difficulty level of each process can be expressed on a scale from 1 to 10...
・Sanding: 10
・Assembly: 7
・Painting: 2 (hair only 8)
・Eye painting: 9
The process is as follows. The long, intricate hair is basically a demon for garage kits, so sanding, temporary assembly, and painting here will take up a lot of time.
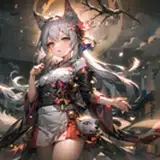
The color scheme itself is simple, so there is no problem if the basic colors are followed. The hair color of this ibis is almost the same as that of the ibis sculpted by Aoki, since the client was the same as the ibis.
By the way, I spent about 50 hours just for the surface treatment of the hair. It is a very complicated part, so it is safe to work on it with breaks in between. Although it is a boring surface treatment part, it is often the most time-consuming part.
The video also shows some of the areas to be corrected, but there are many areas that need to be sanded after filling with Cyanon.
↓ these places
 ↓Sanding after removing unwanted parts with a knife for this kind of thing.
 The bangs also need to be corrected because of this step displacement.
 We recommend that you work with these parts as they can be created during the manufacturing process and can't be helped. That is the nature of garage kits. Needless to say, there is nothing better than not having to make corrections.
Anyway, after taking the time to carefully process the hair parts, temporarily assemble the kit. The hair parts have a complicated structure, so I assembled them while carefully looking at the examples.
 ┃Painting
As for the hair color, as I have told you many times, we decided to use a color with a slightly higher saturation. Here, too, we tried several times to find just the right saltiness in the hair color.
 At first, the color was very orange, so I made it a little more yellow.
Personally, I can't produce this kind of color with raw bin colors, so I make them by mixing colors. Basically, I rarely paint any of the parts using raw paint from the bottle, and I mix any of the existing colors (regardless of the dye pigment) with the pure CMY base color.
I mix pigment+pigment, pigment+dye, dye+dye, etc. in various combinations, so I am not always sure what the original color was...
It's interesting because it's not possible to express the color scheme only with bin colors, and I get excited when I get the color scheme just right. That's why I do it because it's fun.
The bunny suit has a slightly less glossy, metallic look to it.
 It would be nice to make it shiny with candies, but I thought a modest moist gloss (?) with a slight pearlescent sheen would be more elegant. I thought it would be elegant and nice.
I think it depends on each person what they are looking for in a figure such as a bunny. Personally, I think it is important to think about what kind of situation, what kind of place, and what kind of person is looking at the character while working on the figure.
So, I think I was painting while thinking things like, “Since the character will be in a place where people can see her to some extent, it would be nice to paint her with a touch of elegance and sex appeal.
Well, I think you can paint GKs any way you want without being conscious of such things.
Also, this is an aside, but Korean rubble is not white, but a slightly ivory colored resin. I asked a Korean sculptor about the reason for this, and he told me that there is only one factory in Korea that produces this type of resin, so it is inevitable.
The foot part is a single part, so please make sure to mask and paint it well to avoid any leakage.
┃Eye painting (face work)
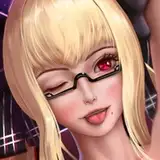
Next to surface treatment, the most difficult part of this kit is the eye paint. As you can see in the example (decal), the eyes are asymmetrical. However, the eye guides are symmetrical.
 Face with decal applied by check
 I think this is a special case of the type that occurs because the work is posed facing forward. Most figures are posed facing forward with their eyes averted to the side, so you can draw them symmetrically without thinking about it, but if you do that with this kit, you'll end up with a mess, so you need to be careful.
I wonder how hard it must have been for the person who made the decals to create eye lines and eyelashes that look right from any angle... I can't reach the decals, but I can understand that the decals are well thought out, so we can copy them exactly as they are and draw the same eye lines and eyelashes as before. We can paint without any mistakes if we imitate the decal exactly.
So, I painted the eye-paints following the same pattern.
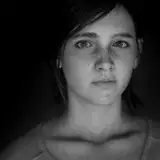
 The lower part of the right eye is glowing. This is a clear indication that the eye guide is being ignored.
 I think you can proceed smoothly by being aware of the size of the eyes and the overhang of the guides at the time of preliminary drawing.
This is a great kit that expands the range of expression since imitating the decals means drawing with the guides sticking out! (Super favorable interpretation)
The atmosphere of the same character will change considerably between a face that is based on the official image as much as possible and a face that is conscious of the illustrator's drawing style. I would like to use them differently.

 If there is no breakdown from any angle, I think it is ok.
Although it is a hard kit to build, French Doll has done a good job in sculpting Asanagi's one and only whip-smacking Toki, so if you have this kit, I recommend you to put your heart and soul into building it.