1. Refined Sketch - I had the basic idea of having the character standing in front of a crashing wave, with the night sky nebulae above. My refined sketches are done over the roughs with a tighter, smaller bush and I am very purposeful in my line-making.
2. Lineart, Local Color - I stay very true to my refined sketch when doing linework. I use a textured, full opacity brush and keep the weight even throughout the figure except on the eyes, mouth, and eyebrows. For the local color, I use a medium-soft airbrush. This character was simple to color and did not require any blending or fur texture at this stage.
3. Background -For the background, I decided against a nebula and opted for a slightly overcast sky. I used a photo reference for the colors, and this is also where I was reminded of bioluminescent algae! All BG work at this stage is done on multiple layers with the same medium-soft airbrush.
4. Base Shading and Lighting - This is where the real work begins! The base color and lineart layers have been merged at this point. There are a multitude of layers here, but I start with two on multiply, one is a full fill over the figure with a color form the BG at a low opacity, and the other is a bit higher opacity with blocked in shading.
I then go in with a bunch of gradients, both clipped to the figure and ones over the whole image. I play with different layer modes, this particular one had some in Overlay and Hard Light to get the underglow from the waves working. There are some more Overlay and Multiply layers on the top and bottom of the BG as well. I also added some rim light on her lower body where the waves are closest to her figure. A rough sketch of the wave was put in as well, trying to figure out how I was going to achieve the glowy algae.
5. More Waves - I decided one wave behind her wasn't enough, so I started painting in more more surrounding her. I'm not very concerned with photorealism or being particularly neat here.
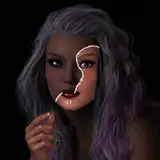
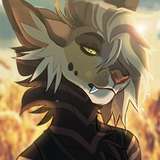
6. Overpainting and Blur - I bring the layered file into PS now and start painting over the figure, editing the mouth shape, adding hair shine, eye shine, and a bit more darker shading on the face. The BG is edited a bit. I also refine the waves and add some splashes and sprays.
I merge ALL layers and use Iris Blur to create some focus on the form.
7. Color Editing and Post Processing - I create some adjustment layers and play a bit with contrast and brightness. I take the fully merged file into the CameraRAW filter and play with settings until I reach something I'm happy with. I add noise, reduce sharpness, and make more color adjustments.