SakeTami
tfiddlerart
tfiddlerart

patreon


Cypress Sculpt Update (Moodity Warning) 🐮

Hey guys! One more update on this guy before the end of the month!

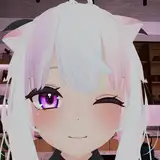
So after the last update, I'd gotten some advice from Nicolò and Kuro on adjusting the surface so that it wouldn't seem as "plastic" looking. Also, some of the advice from Nico also lead to me figuring something else, which I'll get into later.

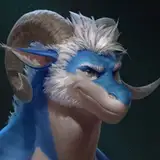
So my initial try involved porting one of the brush alphas from Procreate, specifically the large Flicks one. On a new layer I used this brush to make a more mottled skin tone, that used lights and dark speckles to break up the larger smooth values. This first step already made a bid difference. but I decided to go further. This is where Nico's advice came in handy for another area.

He'd had been explaining that the paint brush has several settings (roughness, metalness, and opacity) the important one here, being the "roughness." If you adjust the value to 1, the paint will be rough, meaning that it's totally matte and won't reflect any light. However at 0, it's very reflective, almost as if the surface is wet. (I'm probably butchering this, but that's my surface level understanding 😂 The cool part about that though, is I found that you can also just turn off the actual paint pigment, and paint that reflective value directly onto the surface. THAT is how I was able to selectively make his nose and the area around his eyes wet 😂 Funny how such a minor thing can make such a huge difference in making something appear more life-like lol.

So anyways, the main point of knowing this about the roughness setting, was to adjust that setting for all of the paint I'd already applied. Then after that, I did what Kuro and Nico both suggested which was to change the material setting to "Subsurface Scattering" (basically when light passes through the surface of an object and gives it a slight glow effect. Think skin, wax or even clouds) This would ultimately make the surface more waxy looking, until I'd adjusted the depth setting to make it appear more like skin.

This was only the first stage though, because after that, I took their advice again, and went over every surface adding texture to break up that plastic like smoothness even more. (Including the hair) This was a long process 😂. In the end though, it was worth it. because although still quite stylized, he looks much more life-like than he did before. 👍

Also, unfortunately no turntable for this update. With all the added detail, the animation is getting quite laggy and is more distracting than anything. 😅 I'm not sure if moving the file to a different app to get a better video, will help or not, but if I figure something out by the next post for this guy, then I'll let you all know! In the meantime, I'll just try to take more photos 😂

So that's it for this update! Thank you guys again for all the comments and support on the last post, as well as the advice from a few of you! Really appreciate it, and I hope everyone has a great end of the month and Weekend!

Enjoy! 😊🙏💙

Cypress Sculpt Update (Moodity Warning) 🐮 Cypress Sculpt Update (Moodity Warning) 🐮 Cypress Sculpt Update (Moodity Warning) 🐮 Cypress Sculpt Update (Moodity Warning) 🐮 Cypress Sculpt Update (Moodity Warning) 🐮 Cypress Sculpt Update (Moodity Warning) 🐮 Cypress Sculpt Update (Moodity Warning) 🐮 Cypress Sculpt Update (Moodity Warning) 🐮 Cypress Sculpt Update (Moodity Warning) 🐮 Cypress Sculpt Update (Moodity Warning) 🐮 Cypress Sculpt Update (Moodity Warning) 🐮 Cypress Sculpt Update (Moodity Warning) 🐮 Cypress Sculpt Update (Moodity Warning) 🐮 Cypress Sculpt Update (Moodity Warning) 🐮 Cypress Sculpt Update (Moodity Warning) 🐮 Cypress Sculpt Update (Moodity Warning) 🐮 Cypress Sculpt Update (Moodity Warning) 🐮 Cypress Sculpt Update (Moodity Warning) 🐮 Cypress Sculpt Update (Moodity Warning) 🐮 Cypress Sculpt Update (Moodity Warning) 🐮 Cypress Sculpt Update (Moodity Warning) 🐮 Cypress Sculpt Update (Moodity Warning) 🐮

Comments

That's okay, the auto-remesher is helpful to get an interim "base mesh" so you can start taking advantage of the multi-resolution workflow without having to spend time hand-crafting it yourself. Retopologizing is an art in and of itself, and in some circles people can get very obsessive and tribalistic over how it should be done. But the gist of it is quite simple and very forgiving as long as you're not trying to go for crazy expressions or deformations, then it can get trickier. It is time-consuming, though. In the end, a hand-crafted topo is only really useful for animation (and specifically, for the person who has to rig the character). The video you sent isn't exactly what I was talking about, but the idea is similar. This is more what I was thinking: https://www.youtube.com/watch?v=QcvE2OrXyQ0 https://www.youtube.com/watch?v=Ka3BpbsdSY8 In your video, the guy projects textures over a piece of geometry he decimated. "Decimation" is a slightly different way to process a piece of geometry, where given a polygon count goal, the end result is a mesh that as closely retains as much of the high-res detail (sculpt detail, not color), with as little geometry as possible (that is, as efficiently as possible, not necessarily uniformly, nor cleanly. And indeed, the end result is all uneven triangles). For a coin, that's kind of overkill, but think of a posed character with a lot of microscopic detail. It is useful when you want to export the geometry for 3d printing with a smaller footprint. What I meant is reprojecting the actual sculpted detail, since once you remesh, you start off with a low resolution geometry. You will also be able to reproject the color you painted, but keep in mind that so far what you have done is paint vertex colors, not a "true texture". This means that the amount of detail you can paint is directly tied to the amount of vertices you have, since they functionally are "pixels", every vertex stores a color value. On the lowest resolution level of your quad-remeshed geo, you will see a blurred version of your color since you have less "pixels". You will have to subdivide the base mesh a few times in order to have a comparable amount of geometry as your original sculpt mesh in order to see the same amount of detail. But you will have to do so to see the details of the sculpt itself anyway. This is where UV unwrap comes in https://nomadsculpt.com/manual/topology#uv-unwrap-uvatlas Again, this is something that is best done manually, but the auto-uv unwrap should work fine as an interim thing. You UV unwrap at the lowest resolution level, then the higher levels are computed automatically. What you then do is "bake" the vertex color down to a "real" texture, so that the color detail is tied to the resolution of the image texture file rather than the geometry itsel, and you'll be able to see full detail color even at lower geometry resolution. You can still retain the vertex color, as they are two separate pieces of information. There is a little bit of information loss when going through all these processes, both sculpt details and color details, so it is better to not go crazy on the polishing and finishing until you're sure you're not going to change the underlying topology and UV any further. I am assuming that Nomad does not let you paint textures directly, only vertex color. This I think is where you will hit a wall, as directly painting textures on 3d geometry is outside the scope of Nomad. The fact that it lets you control different material parameters (i.e. color, roughness and others) via vertex color is already more than is expected of a sculpting app. You're still free to edit the vertex color further, even once you've reprojected it, you're only transferring it to a new piece of geometry, but again, "real textures" are a whole other can of worms to handle.

Nicolò Piccinini

How long ago did you start 3D modeling? This is crazy good for a starter project.

Eren Yanno

Thanks Astrazel!

Taran

Thanks man! This was actually super helpful! I did end up getting the paid dlc, just to see how it handled the remeshing. It's wasn't too bad from what I could tell, though I'm sure being more deliberate but doing it by hand is far better. I would like to eventually do it by hand, and watched some videos on it, but I think for now, I don't want to put too much on my plate all at once 😂 Also, regarding projecting the high res texture on a lower poly mesh, I did read through the link you sent, but it kind of went a bit over my head 😂, though I did try to do some more research into the topic, and found this video that I think explains it? Is this more or less the idea? https://www.youtube.com/watch?v=ARKOI0b8EpU&list=LL&index=1 Also, is this something that would have to be done at the very end, because I'm imagining that with the high res details now just being a projection, you would no longer be able to edit them in the same way going forward?

Taran

Thanks Po! Eventually! I think this is a good first step though. It's just gonna be about learning the tools and seeing what I'm actually able to pull off at this point 😂

Taran

Haha thanks Dragore! 🙏

Taran

Thanks Kuro!

Taran

Thanks Burr! I agree and I'm really thankful for the pointers and advice 😂

Taran

Thanks Buru! Eventually, I'd like to, but I also have to be realistic, that kind of stuff will take me quite some time to learn I'm sure, so it wouldn't be anytime soon unfortunately 😅

Taran

Thanks bud!! 💙

Taran

Thanks Soul!

Taran

That's just gorgeous!! Can't wait to study the anatomy of this You're an inspiration 💪

Astrazel

I can only take an educated guess, but probably once you've added the skin noise detail, in order to render it, the app added so many triangles your ipad is just struggling to keep up. This is where the next step of the process would come to your aid, i.e. retopology. It basically means going over your model by hand and creating an ordered grid of uniform, 4-sided polygons that cleanly wraps and follows the contours of your sculpt, at low resolution. Basically, you want something that defines the shape of your sculpt cleanly and with as little geometry as possible. For example, if you were to retopologize the horns, they would be tapered, curved tubes. But so would be fingers, and arms, and legs. Even the torso can be approximated to a short, wide cylinder. You can then increase the resolution via subdivision, i.e. every polygon is divided into 4, and the amount of geometry quadruples each iteration. The thing about having it this way is that since subdivision is a maths operation, it is invertible, and you can easily choose at which resolution level you want to work at instead of being stuck with the high-resolution. Plus, it's more efficient for the app to handle https://nomadsculpt.com/manual/topology#multiresolution-workflow Nothing beats doing retopology by hand, since you have full control over it (you would have to go outside of Nomad for this), but some apps have an auto-remesher that do a semi-decent job. Nomad has one too but it's a paid dlc apparently, lmao that kinda sucks. https://nomadsculpt.com/manual/tools#quad-remesher To get the details back on the retopologized geometry, you just reproject them from the original raw sculpt mesh https://nomadsculpt.com/manual/topology#reproject-to-vertex

Nicolò Piccinini

Love the SSS shadings on the nose !!!! Btw have you ever thought about trying a stylized approach like your painting style in future?

Po

have a mighty need to boop that snoot

Mani Skaldulfn

He looks freaking incredible dude omg. He looks so darn huggable. You are simply one of the best artist right now.

Dragore Skywing

This is amazing!! I definitely need to try out Nomad sculpt. Wonder if an old iPad Pro is okay for it

Asher Tail

He is so beautiful... And getting so realistic that he looks like he has to move out of the T-pose and act naturally.

Treeknocker

Now, it might be a bit too rough but that's a way better rendering, you implemented well our feedback

kuroson

Wow that texture is coming along so nice!!!! Changes the whole model

DerpyDrake

Handsome moo now in 3D 🐂

TurTheBull

Look how wet his nose is. It stands out and it's so accurate to life. x) Great job learning all this! You've got some great pointers from some really talented folks \o/

Hakawne

He looks so great

LDM

Ayy nice update to the details!

Pseudo Leopard

Amazing work! Are you looking to get him animated / rigged?

Buru

WOW TARAN THIS IS SERIOUSLY INCREDIBLE OH MY GOD 😂🤎🤎🤎 IM ACTUALLY SO IMPRESSED HOW QUICKLY YOUVE PICKED UP ON ALL OF THIS SO FAST, IT MAKES EVEN MORE SENSE TO ME NOW WHY UR JUST THE BEST AT WHAT YOU DO! KEEP IT UP BUD HE SERIOUSLY LOOKS SO AMAZING!! 😭🤎🤎🤎🙏

Hash

Loving the little details added by the texturing, looking better and better.

Soul


More Creators