Here we go!!
First off, I start by making a jaunty little hat out of pop boxes (which will be all the cardboard I use during this) this is what I'll be fixing the mask portion to

-i make a funnel shape out of cardboard to the rough angle a sheep's head shape is
-i cut eye holes so I can see what I'm doing as well as trimming the edges and nose area. I also kinda smush it into a very rounded triangle, so that there's a better suggestion of jawline and nose bridge
-i add an extra strip of cardboard to the nose for structure, and also tape up the snout for a rounded shape

- I start the process of paper mache! I use both shop towels and phone book paper. The first few layers were done with mod podge, but after my roommate did me a solid and got me some flour, I did the usual flour and water method of paper mache. I didn't get a photo, but I used layered up paper towels to bulk up the cheeks and nose structure


I mix flour and paint together to make a super thick, sandable paste and paint on a few layers to get the surface super smooth.
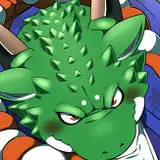
I add apoxie sculpt at this point to define the nose and eyes
- I make the horns as well, they're just cardboard, a quick layer of shop towels, and then hot glue ridges for texture. I paint them black and sponge on red/brown


-for the ears, I cut out the form out of 2 layers of fun foam, then cover it in pieces of fleece. I hand stitch the pieces together, then scrape the seam with a blade to fluff it up and hide the stitches. I add tufts of brushed out yarn to the inner ear, then blush/shade the ears with soft pastels and some eye shadow


-i make the crown from eva foam, sealed it with mod podge, and painted it. It's pretty self explanatory

After painting the head a dark grey, I start attaching pieces! I assemble the head, then start adding Sherpa strip by strip. It's easy to hide the seams


-i was kinda winging it for the cowl, but I glued decent sized pieces of sherpa to the back of the head and inside the jaw. The cowl will stay closed with the collar, no closure needed.
- I make mesh pieces to cover the eye holes by layering tulle and hot glueing a frame into it, flattening it out between pieces of silicone. I cut the pieces out and install them inside the mask similarly, applying hot glue and pressing it in with a silicone pad


-as for the eyes themselves, I use sculpey to make an oval dome shape with a divot scooped out the back. I paint them, then hot glue a magnet into the divot. I can switch out the eyes or go without them entirely by just putting a magnet on the other side of the mesh. And with that, the mask is done! I'll probably do some more blushing on the face, but it's on to the rest of the costume for me!