Tina Doms Marie Breakdown and Insight
Added 2020-12-08 08:56:43 +0000 UTCThis was the longest project yet, as such, I certainly encountered a fair share of issues (major and minor), that had to be overcome to produce it.
When I first started this project out, I noticed the render times were VERY high, over a minute for one frame (using Eevee). This may not seem like a long render time (especially to those using ray-tracing engines like Cycles), but when you have nearly 30,000 frames, you need to target a render time of, at most, 30 seconds.
I knew the issue was with the rigs; now first off let me say both of these rigs were very fun to use, and NO rig is perfect! Very thankful for their use. I have to think part of the issue comes from porting the head from an outside source, and I'm grateful to the creator for the work done!
That said, I quickly recognized the topology as unreasonably dense, and then beyond that, there was a Subdivision Surface placed above it!

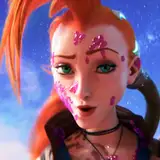
Coincidentally, Marie is making the same face I did when I saw that topology.

It's gonna be okay, Marie!
I knew I could get away with removing the Subdivision on the face, but the body still needed this modifier. Unfortunately, you cannot add vertex groups to the Subdivision Modifier (meaning select a portion of the modifier to affect; I.E., just the head, just the body, or just the booty). So, I had to do some surgery on both models, carefully hiding the seam with the chokers (something which would have likely been added anyway).

This allowed me to remove that ghastly Subdivision on the already over-topologized head, and actually did put the render times at around 30 seconds (still high, but workable).
With the characters all setup, I went to work on setting up the environment. I knew it was going to be a “BDSM Room with a sort of western theme”, so after hours and hours of painstaking research, I put a cowboy hat on a skull.

Perfection.
I try and get the set all laid out first, as once the animation begins, the Blend.file will be split up into dozens of folders. I usually make a Blend file for every single shot (even the little ones) as this just makes things easy to find, easy to organize, and allows me to go back and “re-render” something if need be.
With this project, I stumbled into something of a new “modified loop” workflow, which utilized different sets of bones as well as the graph editor. This allowed me to set up a basic loop (say, Marie bobbing up and down on a sybian while her feet are whipped), and then use a different set of bones to give unique animation at certain points in time. This is a huge plus, and saves quite a bit of time while allowing me to focus on the “big picture” stuff (the major body movement).
Using the prior scene example, this is the process: isolate one set of bones that will be looped and create the animation over the specified frames (in this case, I needed to animate Marie's bouncing, her feet being caned, and finally her feet being whipped).
I then go into the graph editor and give all of these bones a Cycles modifier (using the shortcut “Shift+E = “Make Cyclic”). Finally, I move these bones to a new layer and basically forget about them.
Using the second set of bones, I then go through my traditional animation process to make sure Marie has unique reactions to every hit (loops are good, but in most cases you don't want the scene to be too repetitive).

I also used this process on the walk cycle scene; obviously I'm not going to animate every step individually, as that would be a foolish waste of time. Instead, I created a basic walk-cycle, looped it, and then added some custom animation (using the graph editor) on relevant bones, again using the graph editor to “pause” her animation and thus, her forward momentum.

As a side-note, I'm happy to be getting better at these walk-cycles! While most of the time, my subjects are locked into machines or bondage devices, I do think it behooves animators to know the basics (walk cycles, picking things up, putting them down, punching, throwing, etc). I feel like there's a fair amount of animators out there who can do sex stuff proficiently, but who stumble when it comes to real-world actions. And I'm not knocking that, as hey, we're all here for the sex-stuff! But I think some real-world actions can enhance the scene, and I also want to get better as an animator all around. Trying to practice what I preach!
I don't often talk about audio stuff, but audio is definitely an important aspect of these productions. Usually if the audio is “good”, it goes unnoticed, but if it's “bad”, it's hard to ignore.
With this project, I tried to pay more attention to “panning”, I.E., having sounds come from either side of the speaker to give the effect of being generated on either side of the room. There are certain segments where Tina's voice is given more import on the right/left side to simulate where she's standing.
I want to shout out a program called “Reaper” and give it a recommendation to anyone doing their own audio. It's very easy to use yet impossibly dense, and has allowed me access to lots of functionality I wouldn't have otherwise discovered had I stuck with Adobe Audition.
In Reaper, you can take an audio clip and “draw” an effect on it. So, when the candle goes flying off of poor Marie's head, I wanted there to be a “whoosh whoosh woosh” sound that bounced from left and right, criss-crossing the viewers speakers/headset.
To do this in Reaper, you simply right-click the clip, select “Take: Pan Envelope”, and then you do this!

It's fun! Reaper is full of cool stuff like this and I can't recommend it enough.
Finally, I want to show a little breakdown of the animation process on a shot, and how a shot can look ROUGH for a long time, until that final level of f-curve editing is applied (I've said it before, but if you animate, learn the graph editor! It's where all the magic happens).
First pass is basic dopesheet blocking/timing. I get the characters where I want them to be, when I want them to be there. You get a little sense of the final effect, but things are obviously still rough.

The keyframes are all lined up. This is blocking.

And this is what it looks like! Stiff, but the timing is there.
Secondly, I OFFSET the keyframes.

With offsetting, I suppose there's some artistic interpretation as to WHICH bones to offset where, but generally I use the hip bone as the base (the “center of gravity”) and I go from there. So, I offset the tummy/torso 2 frames, the chest 4 frames, the shoulders 5 frames, neck 6, and head 7 (and then offset the knees the other direction). You can achieve different looks and feels by changing how many frames you offset, and which bones you offset, but I've found that this is generally a good rule of thumb (start with the center of mass and move upwards).
This is what the animation looks like after offsetting:

To note, some animators stop here! But really, we haven't done anything yet! Now, the real work of graphing things out can begin.
In the graph editor, we further offset individual axis (I usually offset the Z-Axis rotation 2 keyframes to obtain a subtle “wobble” effect), and further than that, we add an “overswing” of varying degrees to virtually every single key, on nearly every single bone. This is where most of my time goes! And for good reason, as without thoughtful editing of the graph curves, your animations are far more likely to look robotic/unnatural.


Finally, we add in the facial animation (including lip-sync), and we have a completed shot!

I hope you enjoyed this breakdown! Let me know if you have any questions or want some extra clarification on anything. I'm far from perfect and have tons to learn/perfect, but I enjoy helping people out. Every day there's someone new downloading Blender or going to smutbase, and hey, the more people animating, the more quality content we get.

Talk soon!
Comments
I bypassed the compressor!
BaronStrap
2020-12-18 15:38:44 +0000 UTCAh yes... of course... you had to... reroute the plasma conduits and uh reverse the polarity. No idea what any of these technical insights mean, but whatever you're learning is clearly paying off!
Versus
2020-12-17 01:54:22 +0000 UTCLot of effort but it was worth it! Thanks, Jim.
BaronStrap
2020-12-10 00:54:18 +0000 UTCAmazing work
Jim
2020-12-09 05:57:30 +0000 UTC