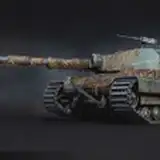
I have completed the build of the 3D undercarriage!
As my autocutter is not working right now I had to cut all the wheels out by hand ... and it wasn't even that much of a fuss! I love wheels that are not just flat discs :-) I cut out all the spaces between the spokes but even when you leave them in and just glue on the outer rings and the inner axle rings it will improve the look of your wheels by 200%
To make the undercarriage a separate module, I had to take some creative liberties but this way I can even make a front axle that you can rotate.

Here you see the underside and how the front axle is connected. You don't have glue the axles together, they should also work if you just stack them on top of each other and put the upper carriage on the whole thing!

The most tricky thing of this process is to get the upper surface level. It took me one correction of the back springs to get them to the right height.
I did not go that far this time, but looking at this assembly I think it wouldn't be a great deal to cut and color some BBQ skewers as wheel axles (you would probably need to make the ends "wider" by wrapping a paper band a couple of times around, so the wheels attach properly) and then attach them to the springs by using a paper band strip as a cuff around the axle glued to the springs -> that way the wheels would be able to roll!
If you want to go even more crazy I see lots of little details ready to be doubled up :-)
That's it for today. I have started sketching ornaments and alt versions if the upper carriage, so I will be working on that now.
Until next time, have fun and keep building!
Chris


![Jive Faury [SDD Lab]](https://saketami.com/istorage/43236.jpg)