The Dark King’s Path: OP12 Rayleigh Full Guide
Added 2025-09-05 16:00:18 +0000 UTCRayleigh is an aggressive deck that applies early pressure, but what sets it apart is its strong defensive capability. With a wide selection of event cards, the deck can effectively protect itself while still advancing its game plan. The inclusion of numerous searchers not only provides steady card advantage but also makes the deck highly consistent, ensuring reliable access to key pieces throughout a match. In this guide, we will break down matchup strategies against common opponents, analyze different decklists, and outline turn structure to help you pilot Rayleigh with confidence and efficiency.

Strengths
Resilient Defense: Rayleigh is very difficult to take down, as it runs a large number of counter events that can shut down opposing aggression.
Explosive Turns: The deck excels at chaining together low-cost characters, creating wide boards quickly. Cards like the 4-cost Luffy amplify this, enabling powerful turns that can overwhelm the opponent.
High Consistency: With searchers forming the core of its engine, Rayleigh reliably finds the pieces it needs. This consistency ensures access to the right cards at the right time.
Weaknesses
Weak Late-Game: Rayleigh is built to establish tempo early and close games quickly. If opponents can stall or drag the match into later turns, the deck loses much of its pressure and struggles to finish.
Problematic Matchups: Certain decks pose major challenges, such as Enel or strategies that can reliably heal or remove characters. These matchups limit Rayleigh’s ability to snowball and often force it into unfavorable positions.
Decklists
Please note that metagame decklists can shift from week to week as the format evolves. To stay up to date with the latest winning Rayleigh builds and other top-performing decks, be sure to check our live stats at https://stats.tcgmatchmaking.com/
With the release of OP12, Rayleigh has quickly established itself as a powerful new leader. Supported by strong new cards from the set and complemented by key staples from earlier releases, the deck has proven to be both solid and consistent, making it a serious contender in the current metagame.
In this section, we’ll start by breaking down the core Rayleigh decklist that defines the archetype. From there, we’ll highlight the key tech cards that players are experimenting with—each chosen to target specific matchups or add extra stability.
Below, you’ll find tested decklists that can serve as a strong foundation for your own builds. Later in the guide, we’ll also evaluate how these different versions perform against the top decks in the format, giving you the tools to choose the right Rayleigh variant for your next event.
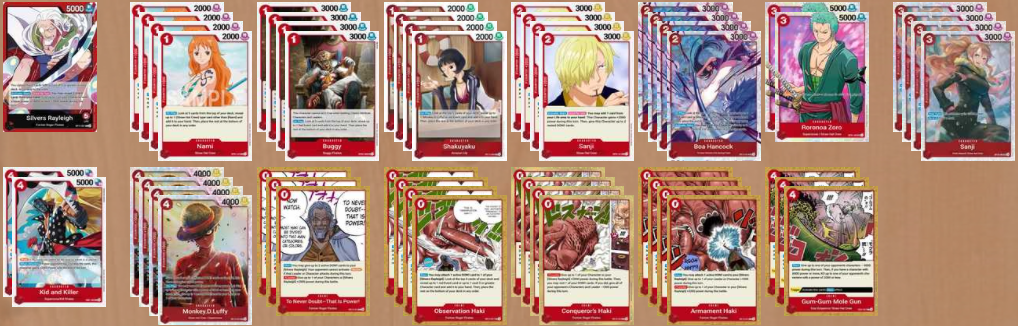
This first list represents the standard Rayleigh build currently performing well on the ranked ladder. It maximizes consistency by running four copies of each searcher, ensuring access to key pieces throughout the game. In addition, it includes three copies of Mole Gun to handle priority threats efficiently, giving the deck both stability and reliable answers.
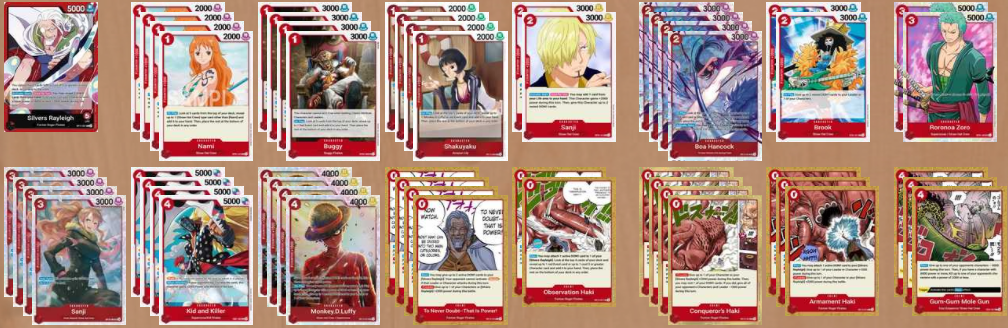
The second list takes a slightly different approach, adjusting the ratio of events while leaning more heavily on Kid & Killer as end-game finishers. Since these cards aren’t searchable, running higher counts ensures you can reliably access them when needed. This build also includes Brook, which serves a dual purpose: as a searchable 2K counter for flexibility in hand, and as an early board-filler when played. Overall, this variation plays a bit more aggressively, aiming to pressure opponents harder while still maintaining strong defensive options.
Possible Tech Options
Nico Robin / Vista: Both provide efficient answers to Rebecca and other small blockers that can slow down Rayleigh’s pressure.
OP01-030 In Two Years!!...: An additional searcher option if you feel the deck needs more consistency in cards. It can also be played off its triggered ability.
These tech choices are situational, but each can help shore up specific weaknesses depending on your local meta or expected matchups.

Mulligans & Early Game Curve
In general, you want to open with a hand that has mostly characters. Since Rayleigh’s searchers can reliably find events, your starting hand should prioritize playable characters to establish early tempo. An ideal hand should include a turn 1 play and at least three characters total to keep your board developing across the early turns.
If you keep a hand light on characters, you risk running out of gas quickly and losing board presence in the following turns.
In short: if your opening hand doesn’t have enough characters to play, mulligan it.
Using Counters
For the most part, you don’t need to worry about taking the first two life cards. Early damage actually works in your favor, since it helps fill your hand and gives you access to missing characters or events that set up stronger turns later.
When it comes to defending your board, you generally don’t want to commit counters to low-power characters. Protecting them usually drains too many resources for too little payoff. The main exceptions are higher-value pieces like 4-cost Luffy, or stronger threats such as Zoro or Kid & Killer, since these units are easier to defend and can swing games if they stay on board.
The guiding question to ask yourself is: “If this character is removed, can I still pressure my opponent efficiently next turn?” If the answer is no, then it’s worth defending. Otherwise, let the smaller units go and save your counters for when it really matters.

Example Curve – Going First
Turn 1: Start by playing a 1-cost searcher. Buggy is the premium opener, but Nami or Shakki are perfectly fine.
Turn 2: Use your Leader ability to buff that searcher. If it isn’t Buggy, commit 1 DON to swing 5K, then follow up with a Leader attack to apply pressure.
Turn 3: Focus on building out your board. Plays like Luffy paired with Sanji, or a 2-cost unit plus another searcher, help keep tempo going. Swing with all available characters before finishing with your Leader.
Turn 4: This is often your first big spike. If you’ve drawn Mole Gun, use it here. Otherwise, stack your Leader skill onto Luffy and start chaining 7K–8K swings to tax your opponent’s hand.
Turn 5+: Keep the pressure relentless. Aim to push them to 1 life through repeated 7K–9K swings, then close the game once they’re at 0 life with your unblockable event.
Example Curve – Going Second
Turn 1: Open by playing two 1-cost searchers if possible. Buggy is ideal, but Nami and Shakki are acceptable.
Turn 2: Use your Leader ability and push for efficient swings (often double 5K). If you have 4-cost Luffy, this is also a great turn to play it for added tempo.
Turn 3: Look to use Mole Gun if there’s a valid target. If not, keep swinging with your board and Leader. Dropping another 4-cost Luffy here is also a solid option to keep the pressure going.
Turn 4: Keep pressuring. If your opponent is already at 2 life, this is the turn to develop Kid and Killer for heavy swings.
Turn 5+: Maintain relentless pressure with chains of 7K–9K swings. Once your opponent hits 0 life, finish the game with your unblockable event.
Rayleigh Matchup Guide – OP12 Metagame
In this section, we’ll break down how to pilot Rayleigh into the most relevant decks in the current OP12 metagame. You’ll gain actionable insights on how to adjust your strategy based on the opponent’s tempo, pressure windows, and power spikes.
We’ll walk through matchup fundamentals that can swing difficult games in your favor.
🔒 This detailed breakdown is available exclusively to Yonko-tier Patreon subscribers or those who have purchased the Complete Rayleigh Guide. It provides starting turn recommendations, matchup-specific guidelines, and critical turn analysis to help you recognize when and how to take control of the game. By diving into data-backed strategies, you’ll gain deeper insight into the evolving meta and refine your decision-making for consistent, competitive success.

Matchup vs Green Zoro
Although the stats say go 2nd, In this matchup for our gameplan, we suggest to go first whenever you can. This slows down Zoro’s usual game plan and lets you build up your own. When looking at your starting hand, try to keep cards like Buggy and Mole Gun. Buggy is very strong here because he can’t be taken out by Slash, which means Zoro will have a hard time removing him. Mole Gun is also important since it gives you a way to deal with Tashigi around your 6 or 7 Don turn, depending on who went first. If you don’t clear Tashigi, Zoro can quickly take over the game.
After that, you should stick to your usual plan: keep pushing pressure every turn, force them to use up their cards on defense, and aim to finish the game with big attacks and your unblockable event once you’ve built enough momentum. The main thing to watch out for is when you’re at low life. Zoro has restand effects that can let them attack multiple times in one turn, which can catch you off guard and steal the game. Always keep this in mind and make sure you have the right events or counters ready so you don’t lose to a surprise finish.
Matchup vs Bonney
In this matchup, we want to go second, as that gives us the best chance to win. Bonney can be tough if we let their board grow too much, but we have the tools to turn the game in our favor. The most important card to look for is Mole Gun, since we’ll need it to remove their key characters like Cavendish, Carrot, or Kid. Without an answer to these threats, Bonney can easily snowball the game.
One of the biggest advantages we have is access to the 4-cost Luffy, which is the best card in this matchup. Luffy not only allows us to develop multiple characters in a single turn, but also serves as a very strong attacker who can swing for 8K with ease. This combination of board development and offensive power puts a lot of pressure on Bonney, forcing them to defend while struggling to keep up with our pace.
Bonney traditionally struggles against decks that can go wide quickly, and that’s exactly what our deck excels at. Focus on flooding the board, attacking as much as possible each turn, and clearing sticky threats with Mole Gun when needed. If you keep the pressure steady, Bonney will eventually run out of cards and won’t be able to defend against everything, allowing us to overwhelm them and close out the game.
Matchup vs Blue Kuzan
In this matchup, we want to go second, as that gives us the best chance to win. The main way to beat Kuzan is by building a wide board and applying steady chip damage with 5K+ attacks rather than relying on a few big swings. Large single attacks are less effective here, since Kuzan can either take the life or stop them easily with events. By spreading out the pressure through multiple attacks each turn, we force them to eventually burn through their hand to keep up.
It’s also important to keep our board healthy. If Kuzan swings into our smaller characters, look to trade back into their searchers so they can’t freely contest our board. The 4-cost Luffy is the best card in this matchup, as it lets us flood the board by developing multiple characters while also threatening strong attacks. Once Luffy is established, we can continue to chip away with our smaller characters and set up finishing turns with bigger swings in the 7K–9K range.
Another key factor is managing our hand size against Pudding. Try to stay around five to seven cards so Kuzan doesn’t get too much value when playing her. To do this, it can actually be correct to defend our board more often than usual, since protecting our characters not only keeps our game plan alive but also limits the advantage Kuzan can get from Pudding. If we stick to this plan—spreading pressure, protecting the board, and using 4-cost Luffy to keep the pressure rolling—we can overwhelm them before they stabilize.
Matchup vs Blackbeard
The stats on this matchup can go either way, but for our plan we recommend going first. Getting the first attacks in helps us set the pace and establish our game plan before Blackbeard can. The main focus here is to build a wide board quickly and keep swinging in the 5–7K range as often as possible. This steady pressure makes it harder for them to defend efficiently and keeps their hand size shrinking turn after turn.
Whenever you get the chance, look to pivot and take out Doc Q. Removing him early makes it much harder for Blackbeard to stabilize. Their leader effect will be used almost every turn, which works in our favor—when paired with our constant attacks, it pushes them into a spot where they run out of cards in hand.
In the late game, Blackbeard will often start chaining blockers to slow us down, but this is where our unblockable events finish the job. Don’t worry too much about playing characters even if their on-play abilities are turned off—what matters most is keeping bodies on board and swinging at their life every turn until we can close out with unblockable attacks.
Matchup vs Shanks
This matchup can be challenging, but solid fundamentals give you a good chance to win, especially if the Shanks player has a low counter hand. Going second is preferred, since it helps you deal with their 4-cost Shanks early and prevents them from gaining too much value off its free blocks. From there, the focus should be on building a wide board and swinging for 6k whenever possible. Always try to attack with your characters first and use your leader skill to buff them so you’re safe against Red Hawk. Mole Gun is your best tool for clearing key threats like 4-cost Shanks and Ben Beckmann, which buys you time to apply steady pressure. The goal is to chip away at their life before 10-cost Shanks can hit the field, and once they’re at 2–3 life, start pushing for heavier swings in the 8k–9k range to close the game. By that stage, their hand should be running thin, giving you the advantage to finish things off. It’s not an easy matchup, but with proper sequencing and well-timed aggression, you can find openings to secure the win.
Matchup vs Rayleigh (Mirror)
In the mirror, going second gives us a slightly better win rate, but the way we play doesn’t really change no matter who goes first. The matchup usually comes down to a race, so our plan should be to attack their life whenever we can. At the same time, don’t be afraid to switch gears and clear their board if needed—forcing them to either waste cards protecting their characters or lose them outright helps us keep tempo.
The card that matters most here is Conqueror’s Haki. Drawing into it and saving it for the late game is often what decides who comes out on top, since it makes it much harder for the opponent to push through our life. Early on, we want to trade their searchers with ours to stay even on the board, and then use our heavy hitters like Luffy and Kid & Killer to push strong 7K–9K swings at their life.
The mirror is always tough because both decks are doing the same thing, but with steady pressure, good discipline, and timely use of Conqueror’s Haki, we can tip the matchup in our favor more often than not.
Conclusion
Rayleigh has quickly proven itself to be one of the most well-rounded leaders in the current format. What makes the deck stand out is the balance it strikes between aggression and defense—few decks can match its ability to flood the board with low-cost characters while also protecting its life total with a deep pool of event counters. The consistency provided by searchers ensures that Rayleigh almost always has access to the right pieces, making it both reliable and adaptable across a wide range of matchups.
While certain opponents like Enel or heavy control decks can present problems if the game drags too long, Rayleigh thrives when piloted with discipline, capitalizing on early tempo and keeping pressure constant until the opponent cracks. Whether you’re building wide with 4-cost Luffy, using Mole Gun to clear key threats, or holding Conqueror’s Haki for the decisive turn, the deck rewards smart sequencing and strong fundamentals.
By following the strategies outlined in this guide—understanding your role in each matchup, managing your resources carefully, and knowing when to push for lethal—you’ll be able to pilot Rayleigh with confidence. It’s a deck that rewards practice, but with the right approach, it can go toe-to-toe with anything in the metagame.
Comments
Updated
Justin Dizazzo
2025-09-12 21:11:55 +0000 UTCThe matchup against Red Shanks is missing.
L. Law
2025-09-12 16:30:48 +0000 UTC