🎪🃏 Full OP11 Buggy Guide – The Greatest Showman of the One Piece TCG 🎭✨
Added 2025-06-20 17:00:12 +0000 UTC
Introduction
In OP11, Buggy has emerged as a viable contender in the evolving metagame—bolstered by key additions from the latest starter deck. These new cards have significantly improved the deck’s consistency, allowing it to maintain pressure while adapting to a range of matchups. With solid tools and a more reliable engine, Buggy is now better equipped to compete at a higher level.
This guide explores everything you need to know to play the deck effectively. We’ll break down tested decklists, popular tech options, and the core components that define Buggy’s strategy. From building strong openings to managing your curve, you'll find practical advice to strengthen your overall gameplay.
For competitive players looking to refine their list and improve results, the full version—exclusively for Yonko subscribers—includes matchup breakdowns, win-rate data, and detailed insights into evolving tech decisions.

Strengths & Weaknesses
Strengths:
Efficient Card Filtering: Buggy thrives on consistency. With a high number of cards that draw and discard, the deck can sculpt ideal hands early and dig for key pieces reliably. This filtering engine allows you to pivot based on matchup and game state.
5-Life Leader Advantage: In a format where many top decks are running 4-life leaders, Buggy gains an edge simply by being harder to burst down. The extra life gives more breathing room to set up plays or recover after pressure.
Cheating Out Threats: Buggy’s leader ability enables explosive tempo swings by putting high-cost threats into play much earlier than usual. This pressure can quickly overwhelm decks that can’t answer tall boards fast enough.
Resilient Board Presence: The inclusion of the new Crocodile-Mihawk card significantly improves the deck’s survivability. It creates sticky boards that are difficult to clear, even for decks with solid removal tools.
Weaknesses:
Conditional Boss Play: The 10-cost Buggy, while powerful, requires a very specific board and timing to stick.
Polarized Matchups: While Buggy does well into several meta decks, it also has a few highly unfavorable pairings. These polarizing matchups can make tournament runs inconsistent if not teched for or properly navigated.
Decklists
Please note that metagame decklists can shift from week to week as the format evolves. To stay up to date with the latest winning Buggy builds and other top-performing decks, be sure to check our live stats at https://stats.tcgmatchmaking.com/
With the release of OP11 and the ST25 Starter Deck, Buggy has gained access to a much deeper and more consistent card pool. These new additions have opened up multiple build paths, each offering different strengths depending on your local meta or tournament environment.
In this section, we’ll break down the core Buggy decklist that defines the archetype, followed by a look at the key tech cards players are experimenting with. Each tech choice serves a specific purpose—whether it’s improving polarized matchups, adding stability, or increasing pressure in the mid-to-late game.
As the OP11 meta continues to shift, adaptability remains one of Buggy’s biggest assets. Below, you’ll find several tested decklists to serve as a foundation for your own builds. Later in the guide, we’ll evaluate how these variants stack up against the top decks in the format—giving you the tools to select the right version of Buggy for your next event.
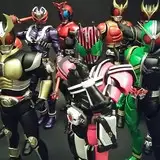
Standard Buggy List
This first list represents what most would consider the standard or "cookie-cutter" Buggy build. It’s a well-rounded list that performs consistently on the ladder and serves as the foundation for most variations you'll encounter in the current meta.
While some slots are flexible—particularly among the event cards like Sanji’s Pilaf—there are a few non-negotiables. Chief among them is Crocodile-Mihawk, which is universally run at four copies. It’s arguably the best card in the deck, offering both board presence and resilience in one package.
A quick note on Sanji’s Pilaf: while it can be strong off a life trigger, its primary function in most games is discard fodder. It’s a playable flex option, but far from essential, and often one of the first cards cut when tailoring the list for specific matchups.
Pudding is another solid inclusion with a high-impact effect that can swing certain matchups. Most lists opt to run 1 to 2 copies, as the deck’s natural card cycling makes it relatively easy to find when needed. There’s a strong argument for running just one—especially in tighter builds—since overcommitting to a situational card can lead to clunky hands.
Her effect is particularly punishing against decks that tend to hold large hands, such as many Purple leaders, which remain highly prevalent in the OP11 meta. In the right moment, Pudding can force a major tempo shift by disrupting the opponent’s resource planning and forcing premature plays.
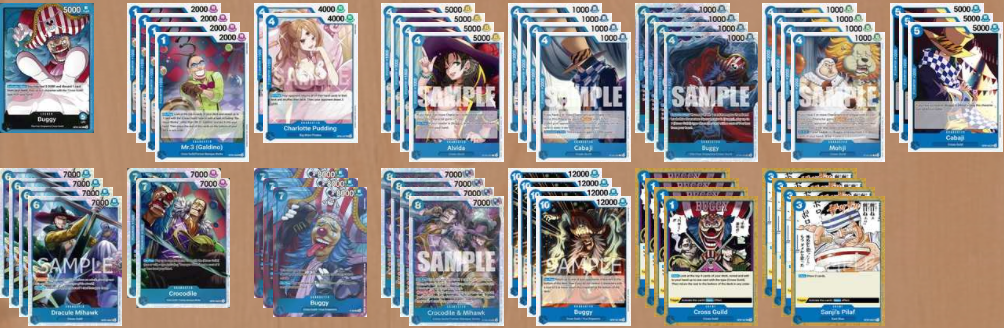
Sables-Tech Variant
This second list is a slight variation of the standard Buggy build, adjusting a few ratios to adapt to the current meta. Specifically, it trims down on the 4-cost Buggy to make room for Sables, a key tech card in dealing with newer threats—most notably the 6-cost Luffy from the Black/Purple Luffy deck.
Sables provides a valuable answer to B/P Luffy’s board presence, disrupting the opponent’s tempo at a critical stage. By the time 6-cost Luffy hits the board, you’ll often have three or more characters in play, making the bounce especially punishing and opening a window to regain or maintain control of the game.
This version sacrifices a bit of raw pressure for flexibility, making it a strong choice in matchups where managing tall threats is more important than early curve aggression.
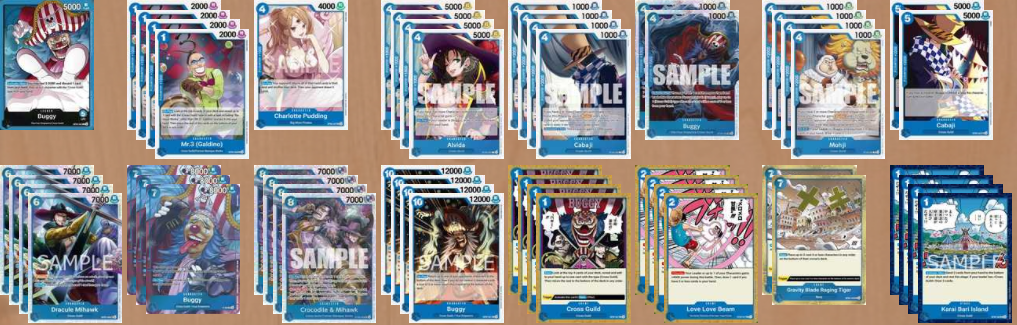
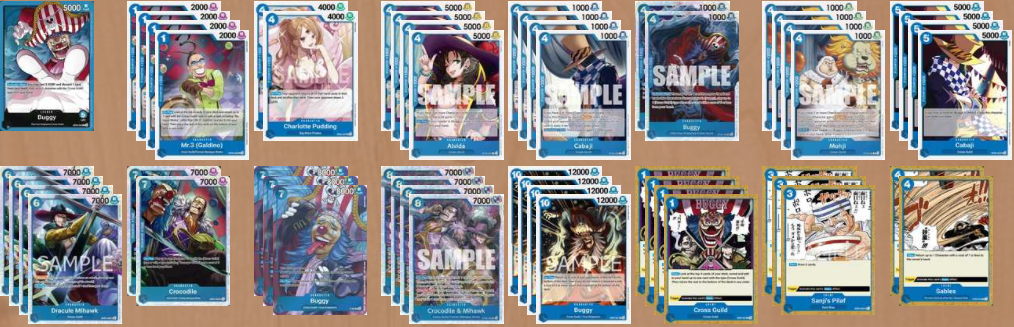
High Consistency Variant
This third list is the most distinct from the standard Buggy build, opting for a streamlined and consistency-focused approach. It completely removes the 7-cost Crocodile and cuts all copies of Sanji’s Pudding, making room for a different utility package.
In their place, the deck includes 4 copies of Love-Love Beam, 4 copies of Karai Bari Island (OP09), and 2 copies of Gravity Blade. Karai Bari Island is a powerful Turn 1 setup card, allowing you to filter two cards from your hand every turn. This ongoing hand refinement helps you find key pieces consistently and stay ahead in card quality.
Love-Love Beam adds reliable protection in the late game, defending your life and helping you draw into answers or threats. Meanwhile, Gravity Blade gives the deck a bit of removal utility, providing another tool to disrupt your opponent’s board and maintain tempo.
This variant is ideal for players who prioritize consistency, clean hand setups, and flexible plays across all stages of the game.

Starting Turns & Early Game Curve
In most matchups, we recommend going first. This gives you access to a smoother early-game curve, allowing you to activate Buggy’s leader ability as early as possible while also gaining the advantage of swinging into your opponent’s board or life a turn earlier.
Additionally, many of the top-tier decks in the OP11 meta also prefer going first, so taking the initiative not only accelerates your own gameplan—it also denies that edge to your opponent.
We’ll dive into matchup-specific strategies later in the guide, but here’s a general overview of how your early curve can develop based on turn order:
Example Curve – Going First
1 DON: Pass / Play a searcher / Play Karai Bari Island
3 DON: 7K–8K Leader swing → Use 1 remaining DON to play a searcher
5 DON: Leader swing → Activate Leader Ability
Typical options: 7-cost Crocodile + 4-cost Buggy, or 7-cost Promo Buggy + 6-cost Mihawk Blocker
7 DON: Sequence attacks → Leader Ability
Decision point: Depending on the matchup, you can shift tempo by playing Sables or Gravity Blade to disrupt, or continue building board to pressure harder next turn.
9 DON: If you have five 5-cost characters, activate Leader Ability to play 10-cost Buggy and remove a major threat. Afterward, sequence your attacks on board or life.
10 DON: Generally mirrors Turn 9—keep applying pressure while managing board.
Example Curve – Going Second
2 DON: Pass / Play a searcher
4 DON: Leader swing → Play a 4-cost (typically Alvida for hand filtering)
6 DON: Sequence attacks → Activate Leader Ability
8 DON: Attack board or life → Use Leader Ability to develop a strong board
10 DON: If five 5-cost characters are in play, use Leader Ability to play 10-cost Buggy and swing tempo. Sequence attacks afterward to press advantage.
These curves provide a solid starting framework, but flexibility is key. Buggy thrives as a tempo-oriented deck, where success comes from striking the right balance between aggression and board control. Rigid play patterns can quickly become exploitable, especially against experienced opponents who understand your deck’s flow.
Buggy Matchup Guide – OP11 Metagame
In this section, we’ll break down how to pilot Buggy into the most relevant decks in the current OP11 metagame. You’ll gain actionable insights on how to adjust your strategy based on the opponent’s tempo, pressure windows, and power spikes.
We’ll walk through matchup fundamentals, optimal mulligan choices, and tech card applications that can swing difficult games in your favor. Learning when to shift between aggression and board control is key to mastering Buggy’s flexible tempo playstyle.
🔒 This detailed breakdown is available exclusively to Yonko-tier Patreon subscribers or those who have purchased the Complete Buggy Guide. It also includes exclusive win rate statistics based on starting turn—helping you understand how much going first or second impacts your odds in each matchup. Unlock deeper meta insight and refine your gameplay with data-backed strategies.

Matchup Overview: Buggy vs Blue/Purple Luffy
This matchup often feels like an even 50/50, but Buggy gains a noticeable edge when going first. The reason is simple—going first lets you swing for 8K on your second turn, which immediately puts pressure on Luffy’s life total and forces them to respond inefficiently. If you go second, that window closes. Luffy’s 6K base power makes it awkward to swing early with your leader, so you’re often stuck passing or making weaker plays. The overall strategy stays the same, but starting second puts you on the back foot.
Going first also sets up a strong first use of your leader ability. Ideally, you’ll play Promo Buggy, which is excellent in this matchup. It can shut down Zorojuro from attacking and deal with Bon Clay before they become a problem. These small wins help you control the board and stay ahead on tempo early.
Throughout the game, try to swing for 6K or 8K as often as you can. These attack values are efficient—they either force out multiple cards or hard decisions from your opponent. While Luffy runs removal like Gum-Gum Giant, the deck also includes a lot of non-counter cards, so every forced discard is a step closer to winning.
On your second leader ability, aim to play Crocodile-Mihawk. This pairing not only gives you strong board presence, but also protects your field from Luffy’s bigger threats—especially 9-cost Big Mom, whose on-play effect won’t trigger if your board is well set up.
In the late game, your focus should be on breaking through their blockers and closing out efficiently. 10-cost Buggy is great here—use it to bounce a key blocker and open a path to lethal. Stick to clean, efficient attacks (6K or 8K) and avoid overcommitting. If you see your opponent sitting on a large hand, consider playing Pudding right before you go in. Forcing them to redraw can leave them with fewer counter options and seal the game in your favor.
Matchup Overview: Buggy vs Blackbeard
This is generally a favorable matchup for Buggy. The key reason is how risky it is for Blackbeard to use their leader ability early. While their effect negates on-play effects, activating it too soon can backfire—especially if you follow up with your 10-cost Buggy through your leader ability. Because 10-cost Buggy will have the on-play effect negated, you can skip the usual five-character condition and still play it cleanly. That alone can swing the game, so most Blackbeard players will hold off on using their leader effect, giving you space to develop your board without disruption.
Promo Buggy is especially strong in this matchup. It shuts down Jesus Burgess, one of Blackbeard’s most dangerous threats, and limits their offensive pressure. Crocodile-Mihawk also plays a big role by making your board difficult to clear, forcing Blackbeard into awkward removal sequences.
That said, you need to be careful of Black hole (4-cost event)—a card that can negate your Promo Buggy’s effect for a turn, allowing Jesus Burgess to swing when you’re going for lethal. If you anticipate they’re holding it, make sure you have enough protection in place—either blockers or counter power—to avoid getting punished on the crack-back.
Buggy also has access to Gravity Blade, which performs well in this matchup. It can remove Van Auger and Doc Q without activating their on-KO draw effects, helping you deny their value plays while keeping your tempo intact.
Overall, this matchup leans in Buggy’s favor. You force Blackbeard to delay their leader ability, you get to fully use your on-play effects, and you can stick to your normal gameplan. Look to swing at life aggressively, especially early on—they’ll often fall behind if you keep pressure up. In the late game, with a wide board and efficient swings, you should be able to close out the match cleanly.
Matchup Overview: Buggy vs Belo-Betty
This is a favorable matchup for Buggy, largely due to how effective Promo Buggy is against Belo-Betty’s main attackers. Once Promo Buggy is on the board, it shuts down their 3- and 4-cost characters from attacking, which disrupts their early pressure plan.
This does two key things in Buggy’s favor. First, it forces the Belo-Betty player to rely more on 1- and 2-cost characters, which are far less threatening even when pumped by their leader ability. These smaller characters are much easier for us to block or counter, especially with a solid hand. Second, with their bigger units locked out of attacking, we can start swinging at life earlier without worrying as much about getting punished by trigger attackers on the crack-back. That lets us push tempo while staying safe.
The key to winning this matchup is to mulligan or search hard for Promo Buggy early. Once he's down, follow up with Crocodile-Mihawk as soon as possible to make it harder for them to remove him using cards like Koala paired with Kuma’s KO effect.
However, be cautious—a good Belo-Betty player may pivot into playing more 5- and 6-cost characters to work around your Promo Buggy lock. If they start applying real pressure with bigger bodies, shift your focus to clearing their board before reapplying life pressure. Flexibility is key.
If you don’t find Promo Buggy early, the backup plan is to starve them—only swing into their characters and avoid attacking life until they run low on cards or overextend. Once their hand size drops, look for a window to safely go for game.
Even when you do have Promo Buggy on board, it’s smart to swing into their 1- and 2-cost characters when possible. This reduces the risk of getting overwhelmed if they flood the board or build wide off triggers. You have all the tools to win this matchup—just don’t get greedy. Play patiently, make clean trades, and the win will come naturally.
Matchup Overview: The Mirror – Buggy vs Buggy
The Buggy mirror is all about setup and patience. It’s not a matchup where you can rush for damage early—you need to develop your board carefully and look for small tempo swings. Going first is a big advantage here, as it lets you activate your leader ability earlier and ideally deploy Crocodile-Mihawk along with a 4-cost character. Getting these cards down first is huge, as Crocodile-Mihawk protects your board from removal, and makes it much harder for your opponent to swing the game back.
One important interaction in the mirror is that Crocodile-Mihawk essentially shuts down the effect of 10-cost Buggy, since its bounce effect won’t resolve against protected boards. That said, 10-cost Buggy is still a 12K body, which makes it a valuable attacker that can help you push through or force blockers and counters later.
In the early turns, it’s usually best to swing with your leader at life, but hold back from attacking with your characters until your board is wide enough to push meaningfully. The exception here is Cabaji (OP09)—if you control a Buggy or Mohji, Cabaji can’t be KO’d in battle, which makes him a safe early attacker that can chip at life and help shift tempo in your favor.
If your opponent overextends or mismanages their board, look to punish them by swinging into their characters. This will quickly burn through their counter cards in the early and mid-game, putting you ahead on resources and pressure.
When it comes to defense, it’s usually fine to take the first 1–2 life in the mirror. However, be very cautious of Pudding. A well-timed Pudding can punish you hard by forcing a discard when your hand is full. Keep this in mind as you manage your resources—sometimes it’s worth using your 4-cost Buggy to play a 6-cost early, not just for tempo, but to trim your hand size and reduce the risk of being punished by Pudding.
In short, your goal is to build a wide board and wait until you have five characters before committing to a major swing. Even though Crocodile-Mihawk protects boards on both sides, the player who can stick more 10-cost Buggy bodies will usually gain the upper hand as the game drags on. Timing, patience, and efficient trades make the difference in the mirror.
Matchup Overview: Buggy vs Black/Purple Luffy
This is generally an unfavorable matchup for Buggy, especially when going second. Going first is critical, as it allows us to start the game with an aggressive leader swing and disrupt their ideal curve.
The matchup becomes much more difficult once they drop 6-cost Luffy, which boosts their leader to 7K power until their next turn. This lets them stabilize the board while swinging for big numbers at our life or characters. Things get worse if they follow up with 7-cost Sanji, which taps down our blockers and opens up clean swings to our life.
To stay in the game, it’s important to get value from our leader ability early. A strong curve is using Promo Buggy to cheat out a 6-cost blocker like Mihawk—this can lock down their 3- and 4-cost attackers, giving us breathing room to stabilize. On your next leader ability, look to play Crocodile-Mihawk alongside another body (ideally 4-cost Buggy into another Mihawk Blocker) to keep your board sticky and your defense strong.
In the late game, 10-cost Buggy becomes your main tool to remove key threats like 9-cost Luffy or Katakuri blockers. Getting one or two of these blockers off the board can swing the tempo back in your favor and create openings to push for game.
This matchup is also the main reason many Buggy lists are teching in Sables. Bouncing their 6-cost Luffy forces them to replay it instead of committing to something more impactful like Katakuri or 9-cost Luffy, buying you critical time to develop your board or pressure life. If they start hoarding cards in hand, don’t hesitate to drop Pudding late game—forcing a redraw can strip them of key counters and set up a game-winning push.
As always, be mindful of Gum-Gum Giant—it remains one of their strongest cards. If they ever pass a turn without open DON!!, consider it a window to punish them hard with aggressive swings into their life, or into their board if we need to stabilize.
Matchup Overview: Buggy vs Green/Yellow Law
This is a difficult matchup for Buggy, as Green/Yellow Law has the ability to develop a wide board quickly and often matches—or even exceeds—our level of consistency thanks to the large number of searchers in their deck. Their ability to flood the board while maintaining hand advantage puts pressure on our tempo and makes it hard to control the pace of the game.
Going first is crucial. It allows us to activate our leader ability before they can play Cavendish, giving us a slight edge in tempo. Swinging early with our leader also helps apply pressure before Law’s board fully stabilizes.
One of the biggest problems in this matchup is the OP11 Bege blocker. Not only does it protect key cards by adding them to life instead of KO’ing them, but it also lets Law reuse those cards with their leader effect on the following turn. When combined with a steady stream of blockers and small attackers, this gives them enough breathing room to stabilize and grind out value.
Our best path to victory is to apply consistent pressure on life with leader swings, while using our own board to keep pace. Because Law tends to maintain a large hand, Pudding becomes an essential card in the late game. Forcing a redraw before a final push can severely reduce their defensive options and open a window to close out the game.
In the late game, 10-cost Buggy becomes a key tool to remove problematic threats like 8-cost Kid, Cavendish, or Law blockers that are difficult to clear otherwise. Also, if the opponent has no Bege on board, Gravity Blade can be a game-changer—removing two bodies and setting them back significantly. Just be aware that if Bege is in play, they can send both targeted characters to life instead, which reduces the impact of your play.
Most importantly, be extremely cautious of Hody Jones in the late game. Don’t let your guard down—even if you have two blockers on the board, Hody can tap them down and leave you wide open for lethal. Always keep this threat in mind and plan accordingly. Whether that means committing more blockers to the board or leaving extra DON!! open for Love-Love Beam, you must prepare for the Hody turn or risk losing the game instantly.
This matchup punishes missteps. You have the tools to win, but success depends on tight sequencing, proper DON!! management, and reading when to pivot between pressure and defense. Play patiently, respect their setup, and look for your moment to strike.
Other Matchups
Purple Luffy:
This matchup generally follows the same fundamentals as the Blue/Purple and Black/Purple Luffy matchups. Always look to go first to disrupt their curve and establish tempo early. In the late game, use 10-cost Buggy to bounce their Katakuri blockers, opening a path to close out the game. If they start hoarding cards in hand, look for a window to punish them with Pudding—a well-timed discard can strip key defensive tools and set up lethal pressure.
Green/Purple Luffy:
This is one of Buggy’s toughest matchups. Green/Purple Luffy can tempo out extremely fast, and we don’t have a reliable way to deal with Sanji-Pudding once it hits the board. If they don’t have their stage active, you may occasionally get value from Gravity Blade to remove key threats—but this is a rare window in most games. Focus on defensive play and careful resource management, and try to clear their board whenever possible.
Conclusion
Buggy has come a long way in OP11, transforming from a gimmicky archetype into a legitimate meta contender. Thanks to new support from ST25 and strategic flexibility through tech choices, Buggy now has the tools to compete across a variety of matchups—from tempo-heavy decks to midrange value engines.
Its strengths lie in strong card filtering, a reliable 5-life leader, and the ability to cheat out high-cost threats for massive tempo swings. While the deck still faces challenges—particularly against fast-paced or blocker-heavy lists—it rewards players who can manage tempo, sequence efficiently, and adapt to evolving board states.
Throughout this guide, we've explored key deck variants, optimal early game curves, and matchup-specific strategies that will help you refine your play. Whether you're looking to dominate locals or prepare for high-stakes tournaments, Buggy offers a unique and rewarding playstyle.
Thank you for reading, and best of luck piloting Buggy through the Grand Line of the OP11 metagame!
Comments
Big buggy fan, I appreciate the guide 🙏
Jordan Hamilton
2025-06-20 23:41:11 +0000 UTC