
🎪🃏 Preview – OP11 Buggy Guide: The Greatest Showman of the One Piece TCG 🎭✨
Added 2025-06-20 17:00:11 +0000 UTC
Introduction
In OP11, Buggy has emerged as a viable contender in the evolving metagame—bolstered by key additions from the latest starter deck. These new cards have significantly improved the deck’s consistency, allowing it to maintain pressure while adapting to a range of matchups. With solid tools and a more reliable engine, Buggy is now better equipped to compete at a higher level.
This guide explores everything you need to know to play the deck effectively. We’ll break down tested decklists, popular tech options, and the core components that define Buggy’s strategy. From building strong openings to managing your curve, you'll find practical advice to strengthen your overall gameplay.
For competitive players looking to refine their list and improve results, the full version—exclusively for Yonko subscribers—includes matchup breakdowns, win-rate data, and detailed insights into evolving tech decisions.

Strengths & Weaknesses
Strengths:
Efficient Card Filtering: Buggy thrives on consistency. With a high number of cards that draw and discard, the deck can sculpt ideal hands early and dig for key pieces reliably. This filtering engine allows you to pivot based on matchup and game state.
5-Life Leader Advantage: In a format where many top decks are running 4-life leaders, Buggy gains an edge simply by being harder to burst down. The extra life gives more breathing room to set up plays or recover after pressure.
Cheating Out Threats: Buggy’s leader ability enables explosive tempo swings by putting high-cost threats into play much earlier than usual. This pressure can quickly overwhelm decks that can’t answer tall boards fast enough.
Resilient Board Presence: The inclusion of the new Crocodile-Mihawk card significantly improves the deck’s survivability. It creates sticky boards that are difficult to clear, even for decks with solid removal tools.
Weaknesses:
Conditional Boss Play: The 10-cost Buggy, while powerful, requires a very specific board and timing to stick.
Polarized Matchups: While Buggy does well into several meta decks, it also has a few highly unfavorable pairings. These polarizing matchups can make tournament runs inconsistent if not teched for or properly navigated.
Decklists
Please note that metagame decklists can shift from week to week as the format evolves. To stay up to date with the latest winning Buggy builds and other top-performing decks, be sure to check our live stats at https://stats.tcgmatchmaking.com/
With the release of OP11 and the ST25 Starter Deck, Buggy has gained access to a much deeper and more consistent card pool. These new additions have opened up multiple build paths, each offering different strengths depending on your local meta or tournament environment.
In this section, we’ll break down the core Buggy decklist that defines the archetype, followed by a look at the key tech cards players are experimenting with. Each tech choice serves a specific purpose—whether it’s improving polarized matchups, adding stability, or increasing pressure in the mid-to-late game.
As the OP11 meta continues to shift, adaptability remains one of Buggy’s biggest assets. Below, you’ll find several tested decklists to serve as a foundation for your own builds. Later in the guide, we’ll evaluate how these variants stack up against the top decks in the format—giving you the tools to select the right version of Buggy for your next event.
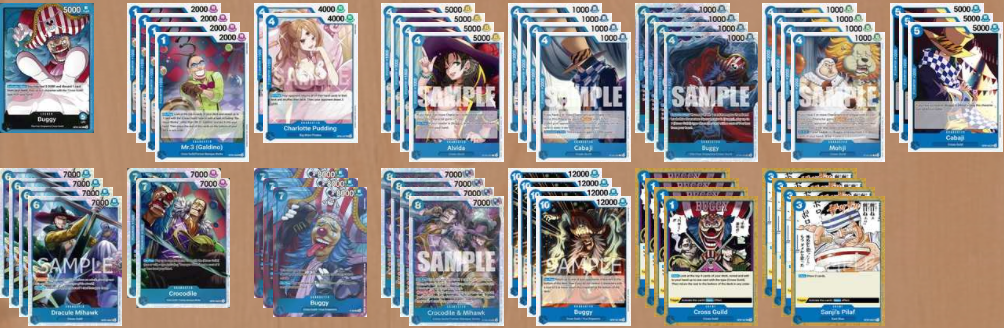
Standard Buggy List
This first list represents what most would consider the standard or "cookie-cutter" Buggy build. It’s a well-rounded list that performs consistently on the ladder and serves as the foundation for most variations you'll encounter in the current meta.
While some slots are flexible—particularly among the event cards like Sanji’s Pilaf—there are a few non-negotiables. Chief among them is Crocodile-Mihawk, which is universally run at four copies. It’s arguably the best card in the deck, offering both board presence and resilience in one package.
A quick note on Sanji’s Pilaf: while it can be strong off a life trigger, its primary function in most games is discard fodder. It’s a playable flex option, but far from essential, and often one of the first cards cut when tailoring the list for specific matchups.
Pudding is another solid inclusion with a high-impact effect that can swing certain matchups. Most lists opt to run 1 to 2 copies, as the deck’s natural card cycling makes it relatively easy to find when needed. There’s a strong argument for running just one—especially in tighter builds—since overcommitting to a situational card can lead to clunky hands.
Her effect is particularly punishing against decks that tend to hold large hands, such as many Purple leaders, which remain highly prevalent in the OP11 meta. In the right moment, Pudding can force a major tempo shift by disrupting the opponent’s resource planning and forcing premature plays.
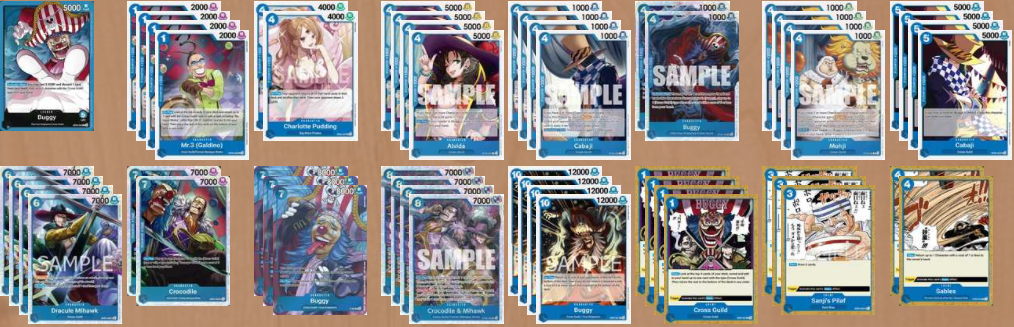
Sables-Tech Variant
This second list is a slight variation of the standard Buggy build, adjusting a few ratios to adapt to the current meta. Specifically, it trims down on the 4-cost Buggy to make room for Sables, a key tech card in dealing with newer threats—most notably the 6-cost Luffy from the Black/Purple Luffy deck.
Sables provides a valuable answer to B/P Luffy’s board presence, disrupting the opponent’s tempo at a critical stage. By the time 6-cost Luffy hits the board, you’ll often have three or more characters in play, making the bounce especially punishing and opening a window to regain or maintain control of the game.
This version sacrifices a bit of raw pressure for flexibility, making it a strong choice in matchups where managing tall threats is more important than early curve aggression.
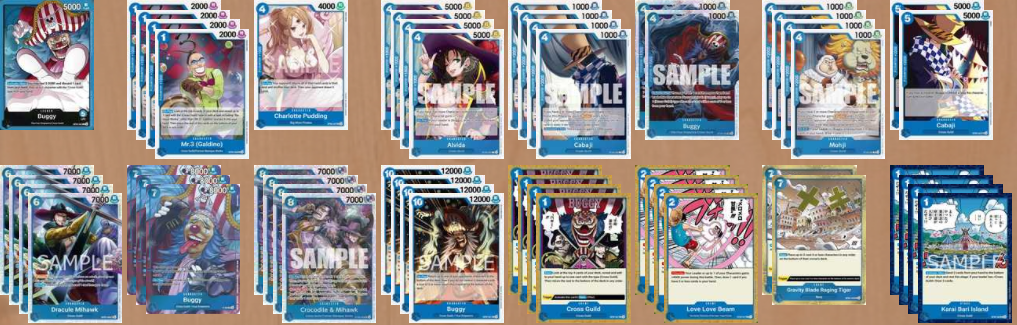
High Consistency Variant
This third list is the most distinct from the standard Buggy build, opting for a streamlined and consistency-focused approach. It completely removes the 7-cost Crocodile and cuts all copies of Sanji’s Pudding, making room for a different utility package.
In their place, the deck includes 4 copies of Love-Love Beam, 4 copies of Karai Bari Island (OP09), and 2 copies of Gravity Blade. Karai Bari Island is a powerful Turn 1 setup card, allowing you to filter two cards from your hand every turn. This ongoing hand refinement helps you find key pieces consistently and stay ahead in card quality.
Love-Love Beam adds reliable protection in the late game, defending your life and helping you draw into answers or threats. Meanwhile, Gravity Blade gives the deck a bit of removal utility, providing another tool to disrupt your opponent’s board and maintain tempo.
This variant is ideal for players who prioritize consistency, clean hand setups, and flexible plays across all stages of the game.

Starting Turns & Early Game Curve
In most matchups, we recommend going first. This gives you access to a smoother early-game curve, allowing you to activate Buggy’s leader ability as early as possible while also gaining the advantage of swinging into your opponent’s board or life a turn earlier.
Additionally, many of the top-tier decks in the OP11 meta also prefer going first, so taking the initiative not only accelerates your own gameplan—it also denies that edge to your opponent.
We’ll dive into matchup-specific strategies later in the guide, but here’s a general overview of how your early curve can develop based on turn order:
Example Curve – Going First
1 DON: Pass / Play a searcher / Play Karai Bari Island
3 DON: 7K–8K Leader swing → Use 1 remaining DON to play a searcher.
5 DON: Leader swing → Activate Leader Ability
Typical options: 7-cost Crocodile + 4-cost Buggy, or 7-cost Promo Buggy + 6-cost Mihawk Blocker
7 DON: Sequence attacks → Leader Ability
Decision point: Depending on the matchup, you can shift tempo by playing Sables or Gravity Blade to disrupt, or continue building board to pressure harder next turn.
9 DON: If you have five 5-cost characters, activate Leader Ability to play 10-cost Buggy and remove a major threat. Afterward, sequence your attacks on board or life.
10 DON: Generally mirrors Turn 9—keep applying pressure while managing board.
Example Curve – Going Second
2 DON: Pass / Play a searcher
4 DON: Leader swing → Play a 4-cost (typically Alvida for hand filtering)
6 DON: Sequence attacks → Activate Leader Ability
8 DON: Attack board or life → Use Leader Ability to develop a strong board
10 DON: If five 5-cost characters are in play, use Leader Ability to play 10-cost Buggy and swing tempo. Sequence attacks afterward to press advantage.
These curves provide a solid starting framework, but flexibility is key. Buggy thrives as a tempo-oriented deck, where success comes from striking the right balance between aggression and board control. Rigid play patterns can quickly become exploitable, especially against experienced opponents who understand your deck’s flow.
Buggy Matchup Guide – OP11 Metagame
In this section, we’ll break down how to pilot Buggy into the most relevant decks in the current OP11 metagame. You’ll gain actionable insights on how to adjust your strategy based on the opponent’s tempo, pressure windows, and power spikes.
We’ll walk through matchup fundamentals, optimal mulligan choices, and tech card applications that can swing difficult games in your favor. Learning when to shift between aggression and board control is key to mastering Buggy’s flexible tempo playstyle.
🔒 This detailed breakdown is available exclusively to Yonko-tier Patreon subscribers or those who have purchased the Complete Buggy Guide. It also includes exclusive win rate statistics based on starting turn—helping you understand how much going first or second impacts your odds in each matchup. Unlock deeper meta insight and refine your gameplay with data-backed strategies.
🎪🃏 Full OP11 Buggy Guide – The Greatest Showman of the One Piece TCG 🎭✨
👉 Click here for the full guide