Dye Sublimated eyes
Added 2022-05-26 08:20:37 +0000 UTCIt’s time to learn about dye sublimation! Dye sub is a popular method emerging in fursuit making, primarily for eyes though it can be used for many other things. Dye sub uses heat to transfer an image permanently onto an appropriate surface, using a special printer and paper. It can be a costly process to set up.

The most important thing is a printer that can be used for dye sublimation. It is possible to convert Epson ink tank printers into a dye sub printer, but I chose to purchase a printer that is specifically for professional dye sublimation. The brand is called Sawgrass, and I had to go to America to buy it. The ink is very expensive, but lasts a very long time. Besides this, you will need a heat press of appropriate size for your use, and dye sublimation paper of your choice that fits in your printer.
Sawgrass has a special program for configuring prints, so you cannot just print from photoshop directly if you’re using one. It’s easy though, just format your page and save it as a png before uploading it to the sawgrass program. I started with eyes drawn in procreate and transferred to photoshop. I worked at actual size to help with the setup.

The material we will be printing the eyes on is also white on both sides. This means we will have to dye the back as well, so I make a page with black eyes as well.

Once the images are saved, I upload them to the printing program. It’s pretty self explanatory to set up the image at the correct size, but the next part will be the print setting.

Make sure to select the type of paper you’re using. The product selection can vary, feel free to test different settings. I used mousepad as suggested by LatinVixen. I make sure the quality is high and change the color mode to vivid. From there you can also adjust contrast and such, which might be necessary for deeper blacks.
After that, I go ahead and print the eyes along with the black backing. The colour on the print will appear faded or duller than the image.

now we go to the heat press and prepare the material. We have a larger press so we can use it to make custom minky and other materials as well.

The material we use for the eyes is white PC mesh, which we buy on eBay. You might be able to find it at computer supply stores. We like it because the holes are even and uniform. We cut it to shape to fit each eye.

Next are the settings on the heat press. Right now we find that 325 degrees for 50 seconds is good, but your press might vary depending on material and make. Longer times can burn your eye material.

Lay down your eye material, with the colour prints face down on it. Make sure to cover everything with a heat proof sheet, these can be found on Amazon and some are specifically for dye sub printing.
Once you’ve pressed it for the right amount of time, give the material a minute or so to cool down so it doesn’t warp. Then you can remove the paper and see the result!

Don’t forget to dye the back of the eyes black! That’s very important for good vision.

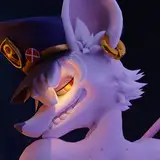
Above is a comparison of our new method vs the old one (the finished eye). Some more adjustments are needed for brightness, but it’s very close. The dye sublimation is permanent and waterproof. The vision is also superior and extremely clear. We would finish the eyes as we usually do with the walls and domes, along with a layer of plastic behind the mesh to completely seal the eyes.

Much better vision with the new method! No tinted colour vision.
if you want to get into dye sublimation, feel free to test any kind of eye material to see what works best for your use.