**An additional screenshot of the lighting menu (specifically for a spot light) has been added with painted dots highlighting what you should be looking to change to alter your lights.
**Youtube seems to have crunched the quality which I apologise for ;3; I've uploaded the video file in the attachments.
For those of you who don't necessarily understand English very well or perhaps feel I spoke too fast, here is a written version of most of the stuff I cover (not translated directly from the video audio though so I apologise for that!)
I've been sick for almost a year with some sinus issues so I'm also sorry about my sniffly nose ^^'' But hopefully you can take something away from this tutorial..thing.
--
Lighting, in my opinion, is the single most important thing you can learn and hone in your art to not only make it stand out, but to make it look natural, pleasing to the eye and photogenic.
The importance of good lighting:
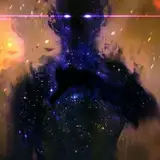
Bad lighting can result in detail being lost in the shadows within the art, characters resembling something akin to clay or plastic props rather than real(ish) people in an environment are quite a common feature.
You can pose, sculpt and texture paint like a god but if your lighting sucks you're not going to be able to portray all that detail and the effort you put into your art in a way that your potential audience might view as pleasing.
If you have bad lighting:
What is bad lighting?
Things to mention:
Blender specifics: