Our wickedly wonderful interchangeable villain lantern is now available from the downloads folder! The lantern has 4 windows for the interchangeable panels and attaches to the roof using 4 corner clips that are also printable separately. It prints in 5 parts with no supports needed, except for the large roof piece, which should be printed with regular (non tree) supports, pointy side facing upwards. In order to stop the light from escaping dark filament is recommended, preferably with 3 or 4 walls instead of Bambu's usual 2 wall settings.
The lantern comes fitted with a wire groove in the bottom to lay flat on any surface and also has a hole in the top for easy hanging. It fits Bambu's led lamp kit 001, but for those who don't have the light an electric tealight holder adapter is also included that can be slotted into the base.
It can be permanently attached together using glue, which is optional (Mainly if you plan to hang it), but unless you plan to keep the same 4 panels do not glue the top panel border where the clips are as you won't be able to change panels afterwards. Assembly is fairly straightforward but if you need any help feel free to drop me a message below, instructions and photos of the HueForge panels have been included at the end of the post.
If you have any questions or issues at all let me know! Up next I'll have some lovely matching Villain bookmarks for you!

Hades
Swap Instructions:
Start with Turquoise
At layer #4 (0.28mm) swap to Cyan
At layer #19 (0.88mm) swap to Cobalt Blue
At layer #35 (1.52mm) swap to Black for the rest.
Jafar
Swap Instructions:
Start with Sunflower Yellow
At layer #12 (0.6mm) swap to Pumpkin Orange
At layer #18 (0.84mm) swap to Red
At layer #40 (1.64mm) swap to Black for the rest.

Queen of Hearts
Swap Instructions:
Start with Jade White
At layer #4 (0.28mm) swap to Red
At layer #19 (0.88mm) swap to Pumpkin Orange
At layer #21 (0.96mm) swap to Black for the rest.
Chernabog
Swap Instructions:
Start with White
At layer #7 (0.4mm) swap to Grey
At layer #22 (0.56mm) swap to Black for the rest.

Mal
Start with Yellow
At layer #9 (0.48mm) swap to BambuLab Green
At layer #24 (1.08mm) swap to Black for the rest.
Oogie
Swap Instructions:
Start with Jade White
At layer #5 (0.32mm) swap to BambuLab Green
At layer #19 (0.88mm) swap to Dark Green
At layer #30 (1.24mm) swap to Black for the rest.

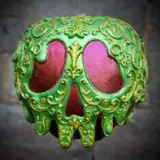
Ursula
Swap Instructions:
Start with Jade White
At layer #9 (0.48mm) swap to Magenta
At layer #13 (0.64mm) swap to Cobalt Blue
At layer #22 (1mm) swap to Black for the rest.
Dr. Facilier
Swap Instructions:
Start with Jade White
At layer #10 (0.52mm) swap to Purple
At layer #20 (0.92mm) swap to Indigo Purple
At layer #27 (1.2mm) swap to Black for the rest.
 Evil Queen
Start with Jade White
At layer #13 (0.64mm) swap to Purple
At layer #26 (1.16mm) swap to Indigo Purple
At layer #28 (1.24mm) swap to Black for the rest.
Cruella
Swap Instructions:
Start with Jade White
At layer #8 (0.44mm) swap to Red
At layer #17 (0.8mm) swap to Maroon Red
At layer #23 (1.04mm) swap to Black for the rest.
Ori Wasserstein
2025-09-11 18:57:58 +0000 UTCPharzyne
2025-08-02 01:03:41 +0000 UTCPoisonApplePrints
2025-07-24 21:41:23 +0000 UTCShannon Mullins
2025-07-24 16:51:56 +0000 UTCPoisonApplePrints
2025-06-26 10:37:12 +0000 UTCSkysThLimit
2025-06-25 15:59:28 +0000 UTCPoisonApplePrints
2025-06-20 17:03:44 +0000 UTCCaroline Bentley
2025-06-20 15:56:34 +0000 UTC