TRACKS UNTOLD: UMRU’S ‘CHECK1’ with umru, Sam Rolfes & Andy Rolfes
Added 2021-11-24 19:02:13 +0000 UTCTRACKS UNTOLD: UMRU’S ‘CHECK1’
with umru, Sam Rolfes & Andy Rolfes
In this Lux Cache track breakdown series, we invite artists, producers, engineers and songwriters to uncover the creative process of their work in their own words. In this chapter, pop-producer royalty umru, alongside visual artists Sam and Andy Rolfes. unpacks the complete intricate production of the Tommy Cash and 645AR featuring ‘check1’ track and music video - highlighting the complete process of initial idea to final product.
This article is available as both a Patreon text post and a preferred-viewing .pdf document format. We ask you kindly to not share Lux Cache content outside of the Patreon, our contributors rely on your donations.
- Additional behind-the-scenes content from the production of ‘check1’, including samples and demos provided by umru and & Team Rolfes, are available to Premium Subscribers on the Lux Cache Patreon.
~

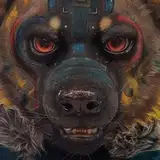
Cover art for umru’s ‘check1’, art by Team Rolfes & umru - released by PC Music.
LC: What are your ties with electronic music as you were growing up? What were the key formative moments in your journey as a producer today?
U: I started trying to make music when my dad, jazz clarinetist and nature sound collaborator and philosophy professor, gave me his old laptop with Ableton installed. It was always very DJ-oriented, the first things I made were always mashups or combinations of free sample pack loops. I never had the dubstep era that most of my peers had, I loved Skrillex like every other middle schooler my age but I never learned how to produce the stuff, I’d be a much better producer if I did. Some of the first music I properly attempted to emulate was after I fell down the SoundCloud rabbit holes of “future beats''/“bass music”/etc., artists like Dr. Derg, Mr. Carmack, Sam Gellaitry, halpe, Wollymammoth... I was equally becoming a fan of the PC Music world and Activia Benz, KKB, Anamanaguchi, and so on around then but the music I was making was never anything close to “pop”. I produced a few beats for rappers around that time but I was very much an instrumental producer until A. G. Cook sent me that fateful email saying he was into my work from hello@pcmusic.info one day in 2016 or 2017. I still have no idea what he heard in me at the time but it was only starting to work with him a bit later and that first credit on Charli XCX’s I Got It that super quickly brought me into the world I’m in now with very little preparation. I still feel like I’m playing catch up in the pop music context but at the same time I can hardly imagine completing a track without a vocal now. The first stuff me and A. G. ever worked on was actually for Tommy, I had been a fan of his as well for ages and I think A. G. loved the Estonian connection.
umru, Charli XCX & Tommy Cash in 2019.

LC: Where did the musical ideas behind check1 start? What was on your mind when you sat in front of your laptop that day?
U: The song was actually fully started in person in Tommy’s kitchen in Tallinn in the summer of 2019 where he had some monitors set up. This is pretty rare for me, I usually try to come up with something before going to sessions to avoid being put on the spot too much. I had been a fan of Tommy’s for much longer (when I was in high school I remember William Crooks sent me Winaloto and said “tell your cousin to calm down”) but we had gotten in touch through A. G. Cook. That year was the first time we had worked together in person, we spent a few days in a row at his place doing shit like recording a medieval flute and bagpipe player.
I can’t remember what exactly we talked about but I was definitely quite scared to disappoint him on the spot, I had only worked on Tommy tracks remotely with A. G. before. We went through a number of versions of the instrumental per Tommy’s requests—the first one was even more stripped back with just a 3 note melody.
This was definitely meant to be a Tommy track at the time, not a feature on a project for me...not that this necessarily changes how a song sounds for me but I think I was much more focused on achieving a simple rap beat as catchy and effective as some of the Youtube NLE Choppa type beats Tommy had been showing me his demos over than any sort of thought into how the instruments sounded. I was working much faster than I would alone and really just seeing whatever got an instant reaction from Tommy.
LC: Could you show and tell us some of the sound design and production tricks that went into check1? What is the general workflow to approaching your sound and what criteria do you look for
U: Though I was working fast and not trying to spend time on sound design I actually ended up making an 808 sound in the room with Tommy that I later saved and came back to a ton, it was done in Nicky Romero Kick2 which I downloaded and started fucking with after Laura Les showed it to me.

check1 808 Source, using Nicky Romero’s Kick 2 plugin.
As you can see it’s got a super fucked pitch envelope which is kinda the most fun thing about this plugin. Kick2 is meant for kicks, not really basses, so the funny thing is the only way to stop the decay of the kick is by muting the track, but I ended up finding that a Tape Stop was quicker and sounded cooler whenever I wanted the decay to stop early, which is why that’s on there.
It’s actually got Fabfilter Pro-R Reverb and kilohearts’ Disperser on the whole thing which was a sort of leftover on my computer from watching sakuraburst (now sylvir) Youtube videos and trying to copy some of her very “wet” bass sounds. It just delays the low frequencies after the highs, and doing this after the distortion in the Kick2 plugin gave it a really nice texture.

check1 808 processing chain inside Ableton Live 11.
As I was revisiting the track later when we decided to try finishing it as an “umru” single, I was trying to find ways to really tie it to the sound palate of the project I was working on without ruining the simplicity and kind of lazy river flow of the whole track. The added laser percussion was a big part of this, it’s one of my favorite presets I made in this Native Instruments Reaktor synth called Kontour, it’s super responsive to velocity so even though I didn’t play it in I spent a lot of time trying to achieve some organic features to it. The challenge was fitting it into a very simple instrumental without feeling distracting. There's a bit where I do a sort of call and response with 645AR that made the beat flow a lot better with the pocket of his verse I think. I’m also honestly amazed how nice I got it sounding with zero processing, it’s literally just the synth and its built in effects.

check1 ‘laser sound’ synth source using Kontour by Native Instruments.

check1 ‘laser sound’ MIDI inside Ableton Live 11.
You can see in the MIDI all the notes are a bit early because in the plugin it’s got the flanger and delay at almost 100% which are delaying the initial signal. There’s also this bit in the build where you can see it’s just one note, there I have an arp and velocity MIDI effect automating up to turn the sound into a riser. This is the kind of stuff Ableton’s really good for, it’s one of the few times I basically imagined an exact version of a sound in my head and then was able to very quickly achieve it.

check1 ‘laser sound’ automation and processing chain inside Ableton Live 11.
The laser’s also very randomized with every note so at some point I had to keep re-freezing the whole track until I liked the exact result. Sometimes I’ll even go through a whole song and record each of the more random sounds and effects to audio manually to make sure the final export won’t surprise me.
I also did this with a lot of the lofi vocal effects using Gigahertz Lossy on small chops of the vocal tracks, I’m very late to it but that plugin perfectly emulates so many versions of the mp3 and online voice call audio compression and glitches that our generation’s unknowingly become so accustomed to. I’m just using the plugin here but I remember underscores showing off how they manually achieved this effect on their album by just running audio files through iTunes mp3 compression dozens of times. The mode I was using (Packet Repeat at a very low Speed) sounded completely different every time so I actually resampled each adlib individually sometimes many times in a row until I got the right one, while messing with the plugin’s settings and making sure I was recording everything. It’s a small detail but I’m super happy with it.

check1 ‘lossy vocal chops’ cuts inside Ableton Live 11.
I had Matt Cohn (of Lux Cache faculty) help me finish the mix and I actually ended up re-bouncing some of the individual randomized grain delays on the claps in the mixing session too because the stems hadn’t bounced the same way as the reference mix.
That’s actually a very Lux Cache technique that sv1 shared on here and showed me as well, I’ve been manually automating and randomizing super short delays with high feedback for those classic metallic sounds for ages, but Ableton’s Grain Delay has a very natural and beautifully randomized sound when doing that using the “Spray” control.


check1 ‘clap’ grain delay & automation inside Ableton Live 11.
One of my favorite added sounds in the final choruses is this squelchy layer on the kick which I unfortunately can’t show how I made, I just know it was using that free synth Vital which I was messing with a bunch when it came out. I do a lot of this process where I’ll just record a lot of pure sound design to audio and then keep it in a folder to come back to, this is one of those.
🔊 check1 kick squelches extra sound design file
Another unique thing in this track that I did for some reason on the spot in the room with Tommy was put some of the vocals into SerumFX, the audio effect version of Serum that lets you use its built in effects on audio. Have to admit this was a direct rip from Dylan Brady, around 2019 he was using the Serum plate reverb with short decay on literally every sound.

check1 ‘vocal chain’ effect processing using SerumFX by Xfer.
One last fun thing is the “pre-clipped” cymbal on beat 1, one of the most obnoxious things about the beat but we thought it hit really hard so we kept it. It sounds like it’s clipping with the bass, but I’ve actually got a Frequency Shifter in Ring mode on it in this little rack william crooks made once (all it does is turn frequency down and wet up with one knob, could’ve done this without the rack easily) and the frequency is somewhere close to the frequency of the bass note so it’s got that clipping effect without clipping the master or bass. It also just cuts off on the clap which is quite funny but I like how it ended up sounding.

check1 ‘pre-clipped’ cymbal processing chain inside Ableton Live 11.
LC: At what point did you decide to get 645AR involved?
U: When I revisited the track this year and floated the idea of releasing it to Tommy, he was the one who wanted to find a feature for it, he mentioned a few names to shoot for including 645AR and Rico Nasty. PC Music were the ones who reached out to his team and he sent in the verse remotely before we had ever really spoken. I met him in New York a few months later though, he’s a super chill dude. In the stuff we worked on later I was surprised just how meticulous he is regardless of how crazy or funny the final product might sound to the audience. He’d sometimes track the same line 15 or 20 times until he got it right. I think that’s honestly what appeals to me about both Tommy and 645AR—they both blew up in “meme” status for doing something outlandish and new, but they both take their work seriously and have managed to outlive their initial viral moments and succeeded in proving that what they went viral for wasn’t just a gimmick.

umru, Dorian Electra & 645AR in New York Studio, June 2021.
LC: Your Splice sample packs have received a great amount of traction since you released the first 'sound cache' in November 2017. How do you feel about the impact of your sample packs within the umru brand, and how does it feel to hear your sounds in massive commercial songs?
U: It’s a double edged sword, I love sharing these kinds of resources and feeling like I have some kind of impact on the trajectory of music production, but I’ve also sort of been fighting against being a “producer’s producer” since my early work doing purely sound design-centered bass music. Tons of producers know my name solely from Splice rather than for my music and since I like to think I make “pop” music I’d ultimately rather be known for the songs I make more broadly than producer circles. Some of the stuff still floating around from the first 2017 sound cache feel impossibly old as well, some are also basically stolen or lightly edited haha—don’t tell Splice but nothing in the world of sample packs seemed as consequential back then, Splice wasn’t nearly as far-reaching as it’s got today.
I definitely have no gripes with massive songs using these sounds though, that’s what they’re for, and even though I’m not getting royalties from those songs, Splice has been the only music project that’s ever really been able to consistently pay my rent so it’s easily been worth it. Kind of pissed this “Lux Cache” thing stole my name though.
LC: 😒
LC: How did you connect with Team Rolfes? What were the first discussions around the theme and concept music video?
U: Sam and I actually met at an early New York PC Music show we both played—the same night I met Caroline, Hayden, Dorian, Mood Killer… really formative night for me honestly. My set ended up being the only one without visuals so before we even really met Sam was doing live mocap visuals for me. I’ve always wanted to commission Sam and Andy for something but their work is simply so time consuming it’s hard to ever have the funding to pay them properly, this was finally the moment PC Music was able to help me do so.
We went through a lot of phases with the video concept but the car was definitely central from the start just because of all the car lyrics. Originally we were imagining this much closer to a “visualizer”, so one of the limitations I thought of originally to keep things simpler was just doing a single angle “dashcam” in the car with all the motion only implied by the characters getting tossed around and the windows. We still get a lot of that in the final video but I think the final combination of shots turned out great. The one visual we weren’t able to end up including was the airbag—the puffer material was one of the earliest ideas I wanted to incorporate into all of my upcoming project’s visuals, as you can see in the artwork and outfits, but we didn’t end up having time to have a puffer airbag activate toward the end of the video.
Sam also wanted to make sure some simple narrative was present in the content, even when we imagined it as just a visualizer. The incoming call overlay was one of the early parts of that, we wanted it to seem like Tommy really wanted to drive to pick up 645AR and hang out with him but I’d keep calling and bothering him, or once I fell out of the car I’d keep calling and he’s physically swipe the notifications out of the way. We also initially meant to have 645AR and Tommy shoot footage that Sam could augment Instagram filter style, but had to end up doing it all animated. I ended up recording face and motion capture acting as Tommy, I’m not even sure how much ended up being used beyond my mouth opening and closing the helmet but it was a funny role to play.


Overlay graphics for ‘check1’ music video, designed by umru.
Since the start of the process we also wanted to have me work on as much as possible of the video and art outside of the 3d space (both due to the low budget and me simply wanting to have input). We originally imagined it as a sort of lyric video as well, though I still don’t know 100% of Tommy’s lyrics so I never added them in. I’m really happy with the final logos and CDJ-screen overlay content + post-processing that I added with the help of Noah Garton (majorbean), but being such an amateur (and user of hell-software Final Cut Pro X) I really brought our delivery time way past the deadline.
LC: Where was the track when Umru first showed you? Was there any direction you both talked about before going into developing the concept?
TR: We can’t remember if 645 was on the track at the point that Umru first sent it over, but it was already well into its “unbelievable banger” phase of development. The personality was already well enough established to get started thinking about what the flow of the shots would look like, and Tommy’s lyrics conveyed enough to get a solid footing for the narrative/scenic angle, which is often the hardest part of video concepting.
As part of the broader discussion of the EP themes and motifs, we’d already been talking ideas a lot -- one of the many blessings of working with Umru is he operates at roughly 100 good concepts a second, and we’ve ended up with a couple documents packed with too many good ideas to execute on at once, eventually honing it down to our favorites.

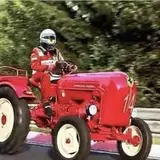
Still from the ‘check1’ music video by Team Rolfes.
.
LC: Could you talk through the narrative for the check1 video, the references you drew from and how you related that with umru's track and direction?
TR: The overarching theme for the releases involve pearlescent, painted puffer jacket materials, remixed decals, fake brands, and comfort sounds, but first and foremost the seed for the check1 vid was Tommy’s lyrics -- car themed to the point we thought any other direction would be absurd (in the bad way).
Playing off the archetypal rap video car setting, clearly we had to have everyone in the ride together, but the way we went about it, and the way the scene developed was, as usual for Team Rolfes videos, a mix of improvisation and following whatever was working best in the moment.

Still from the ‘check1’ music video by Team Rolfes.

Stock photo reference for ‘check1’ music video, provided by Team Rolfes.
We knew it should be slightly more slapstick and fun than some other vids we’ve done, that the characters should be ragdolling around the interior of the car like crash test dummies (an idea developed while recording Umru in mocap -- again riffing on a concept in the moment is where the best stuff comes from, and having Umru around to work it out is a godsend). Despite that, Sam had a different conception of where the core animation would derive from, up until the moment the characters’ movements were actually performed.
Lately we’ve been inspired by Nikita Diakur’s animations, seemingly floppy stupid things that in fact have incredible nuance and character, and once we actually got the characters in the car and tried to make them behave in the animation, it became clear that the car itself was the primary animation input-- the characters were just along for the ride, as it were. Lighting-wise, we’re basically always drawing references from our friend and mentor Tim Saccenti.
LC: What is the general outline of production for music videos like this, in the context of working within VR/video game engines?
TR: Okay so it basically goes in 8 phases: concepting, characters, environment, processing, fx, performance, editing, export:
- Concepting:
First, you start out with figuring out what the gag is. What’s the story, how many characters, what’s the narrative arc roughly, and often most importantly: what’s the main performative mechanic that the whole thing is flowing through. Is it a race? Is it a dance? Is it a still life? How do we build the characters, their movement, and the rest of the scene to harmonize and enhance that?
This is often done in tandem with the label/client, or the musician themselves. We often start with a prompt, a general theme or idea from the musician, and then work it up into a treatment PDF that covers the general plan for the video. You then email it over, hope there’s no pushback, and figure out a way to still just do whatever you want to do if there is any.
To help convey the narrative arc/overall choreography of the video, Sam often does a very rough VR sketch of the environment while Andy draws character silhouettes, and arcing over the environment sketch we draw out some movement lines for where the camera and character(s) will go-- as if we were doing play by play commentary on a football game. We’ll send this off to the label/musician partially to help explain, and partly to dazzle them with unnecessarily complicated technology so they leave us alone for a bit.
Note that we don’t actually know what the video is yet.


Pre-production sketches for ‘check1’ music video, provided by Team Rolfes.
- Characters:
Once the contextual groundwork has been laid, we start into the element that’s almost always the focus: characters. This phase is focused on sculpting the high-resolution version that will eventually be processed down into an animatable state.
Oftentimes we pull from characters made in for previous projects, disassemble them, mash their parts around, and generally just fuck around until something with personality starts to appear. It’s usually very helpful to pair a more abstract base form with some little accessories of specificity. It can be an item of clothing, a facial feature, anything to give the blob more personality than “I went to art school and now you’re gonna have to deal with it”.

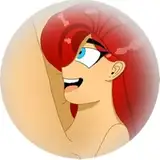
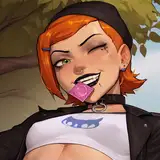
Character models for ‘check1’ music video, provided by Team Rolfes.
Once the character(s) have gotten to a good enough state, they’re passed off to the processing team (Phase 4), while Andy and Sam move to other base level creation phases, like Environment v1:
- Environment v1:
While the characters are being processed for animation, Sam jumps into building out the basic blocking of the environment that the characters are going to be moving through. Usually this is accomplished by importing the rough VR sketch made in the Concepting phase into the sculpting and animation programs, and then building in more polished replacements for the original blocky sketch.
Lighting starts here, as well as beginning to plan out the performance potential for each scene. We try to get it as fleshed out as possible, but it’s only necessary to get it built out to the extent you need to be able to perform/animate against. We also give ourselves obstacles, things for the character to interact with or move over/around/through; that kind of physical dialogue with the environment is significantly more engaging than just having them fly past a disinterested background.
Note: at this point we still don’t know what the video really is.

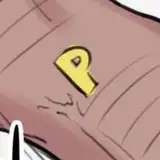
3D model and texture for ‘check1’ cover art, provided by Team Rolfes.

3D model and texture for ‘check1’ music video, provided by Team Rolfes.

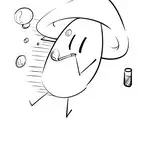
3D character for ‘check1’ music video, provided by Team Rolfes.
- Processing:
This part is boring but essential. It’s all about getting the cool things we made in the earlier phases to be able to actually animate without blue screening your computer. For us, it’s retopologizing, rigging, and UVing the characters, props, and other animation pieces
The way you go about that is all dependent on the animation itself; maybe it doesn’t matter if the UV is fucked, maybe the rig can be super basic, maybe you don’t rig at all and the animation ends up being bunch of static sculptures bouncing around -- regardless you gotta get through it, ideally as fast as possible.
This at least is one of the more delegatable portions; while you want to work with someone who understands your visual language and the way you want everything to move (it’s easy to lose crucial detail if they’re on autopilot), this is a highly technical phase that you don’t need to do yourself necessarily.
- FX:
This is a catch-all phase for whatever isn’t basic animation, environment etc. -- it could be figuring out how to make the whole environment move while you stay still (like in Check 1), or figuring out how to get a flock of abstract bugs to follow your character (like in our Danny Elfman vid), that kinda thing. Typically this is started whenever someone has free time, as early as you have enough of a sense of what the scene needs. - Performance:
For us, one of the most important and most fun parts. The characters are rigged up and ready, the spaces are constructed at least well enough for you to bounce around with some specificity. This is where you figure out what the video is, where you and the character find the personality of the performance together.
The exact way we go about it varies depending on the complexity of each video’s choreography, but often the main character is recorded first, responding to/fighting/running away from/etc imaginary supporting characters that are sometimes blocked in with stand-in shapes.
From there, each supporting character is recorded (usually one by one, but in the case of our Lady Gaga Sour Candy video, recorded two at a time so the dancing was more synchronized).
Lastly usually comes the camera animation, often recorded with a combination of VR headset, VR controllers, and custom coded camera pieces that track specific characters. Now, we finally should have a sense of what the video is, hopefully, because we’re 70% done at this point.

Still from the ‘check1’ music video by Team Rolfes.
- Editing & Environment v2:
Once all the core animation is in, all that remains is to combine everything into a single sequenced animation, and polish nonstop until it’s ready. This is usually a laborious process, but you can make significantly more informed decisions about lighting, materials, fx, etc. because you know what is actually going to be on screen.
In the past, we’ve spent days building out beautiful stuff that never really makes it on camera because it was conceived of before the performance section came in. Those things end up being helpful by being inherited in future projects, but that’s why we try to get the core animation in before really getting into any sort of hardcore polishing and environment development

Post-processing screenshot of ‘check1’ music video, provided by Team Rolfes.

Pre-processing screenshot of character models in ‘check1’ music video, provided by Team Rolfes.
- Export:
Omfg it’s basically done now right? All that hard work and it looks so good, wow. Time to render and send, can’t take that long anyway….
Only thing is that you’re probably going to have to rerender it 5x, fixing different spots, probably a whole section now looks wrong during render even though it looks fine in the preview, probably it takes 4x longer than previous test renders because of some unknown issue that you now don’t have time to figure out. This phase sucks the worst up until the very end. It’s hours and hours of sitting, praying it doesn’t crash, praying the export ETA is actually what it says it is and not 10x longer, emailing the label updates and apologies to placate them. Thankfully though, when it’s all done and you’re watching the frames slowly come in, everything you’ve had in your head up until this point, everything that was mostly theoretical, is now very real and looks even better than you had hoped. - BONUS PHASE: INVOICING AND CREDIT
We aren’t gonna dwell in this section because this could be its own 15-step guide, but basically there’s a very good chance you’re gonna have to hammer the label/client with emails and invoices and be very, very up front about how exactly you want to be credited, that you want to be credited at all! Because in the industry world, nothing is better than posting your beautiful video you worked so hard on with absolutely 0 credits, just some corny caption. You cannot let them do this, so head it off early -- maybe before Phase 1 lol.

Still from the ‘check1’ music video by Team Rolfes.
LC: Did you come across any hurdles in the video production?
TR: For one thing, the entire practice of experimental digital art is usually one of constant (but still somehow unexpected) hurdles and being delirious angry for long stretches of time -- it’s probably collectively wiped out a few years off our lifespans just from the frustrations that come with creating in programs that seem purpose built for breaking in the most counterintuitive ways possible.

Process pic of ‘check1’ edit/review, provided by Sam Rolfes.
Things went relatively smooth though despite that, very much thanks to Umru’s constant help and flexibility with production, but nevertheless we ended up in the classic Delivery Day Cursed Zone.
All of us were up until 5 or 6am the last few nights rendering and passing files back and forth. Because Umru was the last step in the process, he had to deal with the uncompressed final render files, something like 100GB, which he didn’t have the hard drive space for and would take too long to transfer online. So, in a series of sleepless, rainy mid-night handoffs, Umru would walk to Sam’s place and grab the drive, take it back to his, and dial the graphics in for final export.

Tweet regarding the 5AM ‘analog file transfer’ by @umru_.
U: That final all-nighter stretch of exports before the release was super hectic for me and of course completely normal for Team Rolfes. Because of upload and download times we found it faster to transfer files back and forth on a physical hard drive through the streets of Bushwick. Here’s a few BTS scenes of that process-
LC: Given the Team Rolfes history in album and single covers work, how has your approach on imagery developed since you began to work within interactive and animated mediums?
TR: As we’ve both been starting to get a stronger grasp on the mechanics of narrative progression, contextual specificity, and format satire, we think the still work has started to expand to account for that -- more coherent characters in scenes that aren’t necessarily spelled out explicitly for the viewer, but have more contextual stepping stones for an audience to read into the scenes.
Working across animation and stills on the same project allows for a bit more...oh shit I’m gonna say it… world building, where we feel less required to cram the entirety of the story into a single frame, but can let it flesh itself out over a series of pieces.

Character models for ‘check1’ music video, by Team Rolfes.
LC: Where do you see Team Rolfes work heading in the future?
TR: First and foremost, less one-offs that take multiple months to make and then disappear into the tide once they’re released. Series of touring stage shows with larger scale productions that aren’t entirely based around an album release cycle, longform narrative series, actual playable things with more co-ownership and participation with the community around us.
Turning projects down rather than overloading the schedule, suing labels for unpaid work, unionizing with other artists, maybe even affording healthcare 🤞


Tommy Cash, umru & 645AR models for ‘check1’ music video, by Team Rolfes.

Overlay graphics for ‘check1’ music video, designed by umru.
LC: What advice would you give an artist looking to break into new mediums, who may be intimidated by the new skillsets of this technology?
TR: Here’s what we typically tell people:
- Try all sorts of stuff. Try the trend technology, whether that’s AI or metaverse shit or whatever, give it a shot, try pre-rendered graphics, try real-time, try VR if available. Play around without a specific cynical goal in mind for the time being.
- Give yourself a goal project. Maybe it’s like… I wanna make a video where a bird goes shopping. Ok. Excellent concept for one, so that’s solved. Next, you’re gonna need to learn like 100 things to be able to make that happen, and all of them will give you a more holistic sense of the way the tools work than just binging every single basic-level Youtube tutorial (although there will be a lot of that). This helps break the mystique, and begins to let you make creative and technical decisions based on your personal artistic perspective.
- Think back to which programs/skills/pipelines/vibes were the most fun or fulfilling -- that isn’t necessarily the perfect one for you, but consider why it might have made you feel good. Maybe like us you hate waiting for traditional rendering, you want to play in the moment. Maybe you love everything being lit perfectly and want to compose an elegant image, maybe you want the easiest one for shitposting, whatever.
Whatever answer you come up with is a hint to the direction to pursue, but not the ultimate answer -- you’re going to need to keep asking yourself this for the entirety of your artistic practice.

Sam Rolfes & Andy Rolfes, Photography by Tim Saccenti for Setta Studio, with digital sculpting by Team Rolfes.
LC: Where would you place check1 in the landscape of your discography and artistic output, compared to past projects and your plans for the future?
U: This track was definitely created as production for an artist, but I don’t view that very separately from my own output as I feel like at this point I’ve solidified myself as a producer first and foremost, even the project I have coming up is fully centered around various vocalists. I started as such an instrumental, sound design focused producer who didn’t know anything about working with vocals but it really is now hard to imagine myself making a complete song without that component. When I did a remix for an instrumental Baauer track in 2020 I was so stuck with how to move forward that I ended up recording my own vocal to complete what I was doing. (not sure it was any good)
Anyway, check1 feels both dated and new to me as it was initially recorded 2 years ago, I’ve already learned a lot since then, especially in terms of rap production I feel like, but I’m very happy with the final outcome, the latest changes I made were trying to squeeze out a more maximalist, bombastic version of what is in essence a very simple song and beat. I think my work ends up doing that sort of thing a lot, I hope that I’ve gotten a bit better at supporting a song and vocal through that rather than distracting from it which I feel like a lot of my early work did.
LC: What advice would you give to artists just starting out that are looking to develop a sound and style that feels personal to them?
U: There was a period early on where I tried to force this for myself a little too hard by limiting myself to a very small set of samples or plugins, and it definitely helped but it wasn’t necessarily very personal, it was more of an exercise. It’s funny because once I stopped working like that I ended up naturally gravitating toward an even smaller set of sources—there’s one Reaktor synth I’ve been using for 75% of my sounds for years now. Not that this matters, electronic music production is so cyclical at this point, you can get to any end point from any starting point, but for me I think building up a collection of tools or shortcuts or presets, whether or not I created them, has helped a lot in more quickly reaching the sounds I feel are personal to me. I think actually having an ear for what those could be has only come from making and listening to a lot of music, though. I wouldn’t force it.

umru, Photography by Max Schramp.
- Additional behind-the-scenes content from the production of ‘check1’, including samples and demos provided by umru and & Team Rolfes, are available to Premium Subscribers on the Lux Cache Patreon.
~
umru is a producer, recording artist and graphic designer based in New York.
You can stream/purchase his new single ‘check1’ everywhere and follow on Twitter @umru_ & Instagram @umru.
Team Rolfes is a digital performance and image studio specializing in figurative animation, VR and mixed-reality collage founded by Sam Rolfes & Andy Rolfes.
You can check out their work at rolfes.team or @team.rolfes on Instagram


![[M]Alice](https://saketami.com/istorage/96453.jpg)