Introduction
When using in-game textures (from World of Warcraft or other games) to make 3D artwork, there's always going to be a noticeable lack of quality, especially the further back in the expansions you go. The reason for this is quite simple - it's efficient for games.
Most people don't notice the limited quality of the in-game textures since it doesn't stand out as much in motion, people are often not zoomed close in, and the game doesn't revolve around you staring at your character. However, when you export these textures and render them in a fancy 4k up-close scene, it can really detract from the overall quality of a piece.

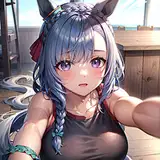
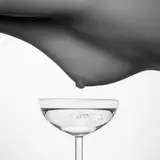
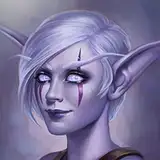
In the image above, you can see plenty of pixelated artifacts around certain parts, more noticeable on the finer details such as embroidery. A solution that's growing more and more traction to solve this issue is upscaling. So, let's explore that!
What is upscaling?
The concept of upscaling is simple; it means to increase the quality of something. You could do this manually, by taking the textures into Photoshop and repainting over them, but that takes a lot of time and effort. Instead, we're going to use a neural network that's been pre-trained on anime-style artwork.
Why anime? The textures from World of Warcraft are very stylized, and if we were to use something that had been trained on ultra high photo-realistic data, the results wouldn't be ideal. Using this specific network, we can achieve very nice results that don't lose any of the game's iconic style.
The Easy Way™
Before we delve into downloads and scripting, let's take a look at the actual process in action. Using a website called waifu2x, we can upload one of our texture files, and it will run it through the upscaling neural network with the settings we provide.
Set 'Noise Reduction' to the highest, and the 'Upscaling' to 2x. Now, let's take a look at the result...

With very little effort, we've taken a small texture file complete with noisy artifacts, and produced a much higher resolution upscaled version.
The Problem
Using the website is all well and good if you're just doing one or two textures from time to time, but realistically if you make a lot of artwork, you're going to be churning through hundreds or potentially thousands of texture files; that gets bad really quickly.
- It takes time to individually upload each image, wait for it to process, and download it.
- A captcha is needed for each run, slowing things down even further.
- The website only allows up to 2x upscaling. For a 256x256 picture, this only gets us to 512x512, which is a long way from 4k.
- An internet connection is required in order to use it.
The Solution
To combat all of these issues in one fell-swoop, I grabbed the software itself and went about writing a quick few scripts to automate the entire process of upscaling hundreds of textures with only two clicks.
In the following guide, I'm going to walk through every step of the process in a (hopefully) completely painless walk-through that anyone can follow regardless of technical knowledge.
Step 1:
We need to download waifu2x-caffe which is the actual software that handles the upscaling for us. To get this, head on to the GitHub page linked below.
https://github.com/lltcggie/waifu2x-caffe
This software (and the project page) is primarily in Chinese, but that won't be a problem. On the page above, select 'Releases' at the top, and on the latest release, download the attached 'waifu2x-caffe.zip' which should be around 200MB in size.


Step 2:
Now that you have it downloaded, create a folder somewhere on your computer (you can call it whatever you like), and then inside that folder, put the 'waifu2x-caffe' folder extracted from the downloaded ZIP.
You'll notice that it comes with a GUI executable. You can use this if you choose, but it's not much different to using the website beyond the ability to do higher upscaling. For the full automation, let's continue.
Step 3:
To run the script I've created, you'll need NodeJS installed. Getting this is fairly straight-forward, just head on over to the website linked below, and grab the latest version. Download and install that, following the default options of the installer.
Step 4:
In the folder you created earlier, create three new folders named 'fix', 'normal' and 'transparent'. I'll explain the purpose of these later.

Your folder should now look like the image above.
Step 5:
Next to those folders, create a new text file called 'process.js' and open it in any text editor (Notepad will do just fine). In that file, copy over the script I've linked below and save it.
https://gist.github.com/Kruithne/acc96ae335e851ec899a1ee039236550
One thing to note inside the script is the 13th line. For my projects, I upscale to 2048x2048 resolution. If you want to upscale higher or lower, then change the value of 20248 on this line to your preference. It is best to keep this a power of 2 (256, 512, 1024, 2048, 4096, etc).
Step 6:
Next, we need to open a terminal in the folder where we created the process.js script. The quickest way to do this is simply Shift + Right Click in the folder and open a terminal. The terminals available will vary; Command Prompt, PowerShell, Git Bash, Windows Terminal etc.

Step 7:
Providing you made it to this point without any major complications, we should be ready to give it a whirl. Take some texture files that you want to upscale, and place them into the 'normal' folder.
Using the terminal that you opened, issue the command 'node process.js'. While it's processing, there will be a number of windows pop up which steal your focus, so just sit back for a few moments and let it work.

Once it is done, the texture(s) should now be upscaled to 2048 (or whatever resolution you configured in step 5). That's it! Or is it..
Transparency and Fixing
You'll remember that we created two other folders earlier, called 'transparent' and 'fix'. Let me explain what both of those do.
Images files are made up of four channels: red, green, blue and alpha. The alpha channel is what decides how transparent a specific pixel is. For a lot of WoW textures, however, this channel is used for different data, but because anything that's not WoW doesn't know this, it gets treated as transparency and the results get weird.

To prevent this causing issues with the upscaling, the alpha channel is automatically removed by my script before being passed to the neural network, this way it does not play havoc with the results.
There are plenty of cases however, where the alpha channel is used for transparency, and you'll want to keep it. For those purposes, place those textures inside the 'transparent' folder and run the command the same.
Additionally, the 'fix' folder will just remove the alpha channel from an image, without passing it to the upscaler. Why? Because I needed that functionality once or twice, so there it is!
TL;DR If a texture should have transparency like a cloak, put it inside 'transparent', otherwise put it inside 'normal'.
Conclusion
Hopefully this guide wasn't too complicated to follow, if you have any questions or problems, feel free to either message me or leave a comment below and I'll do my best to assist.
Also, I'd like to thank Tektah for introducing me to this tool in the first place.