I wanted to put together something explaining how I approach comic panels, so, here we are!
There’s no right or wrong way to approach anything in art, this is just the way I decided to do Oren’s Forge.
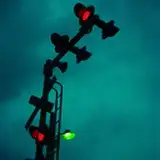
Here’s the reference photo I based the panel around. I liked the hint of washed out blues and sagey-greens, thought I could give it a early morning/pre-dawn feel. (It’s off Google Images after searching for dry riverbeds.)

Part 1 - Sketching/Inks

The first part is my initial layout sketch for the panel. These are small and messy and I usually do a whole scene at once for continuity.

Next is a cleaner sketch, then the inks (I decided to make this panel full bleed after the original thumbnail.) For a complicated scene like this, it takes around 2 hours to go from nothing to inks. A lot of it has to do with how warmed up I am, if I can wrap my brain around the character’s pose or emotion. This one wasn’t too hard in that regard— a bunch of rabbits living their best life.
Part 2 - Blocking In Colors
Then, I block out separate characters, objects and break the ground up between foreground, middle ground, background, etc. I am an absolute glutton for layers when I'm cell shading.

This part is super tedious and I save these bits usually for the end of my work day when I’m pretty brain-dead.
I just pick colors that I think are vaguely what I want at this point. They’ll all get changed shortly…
Part 3 - Color Story
This is specifically my approach for comics: I can’t justify doing separate color studies for every panel. While I want every panel to look good, the reality is most people will only glance at it. It’s one little brick on the story’s path. I don’t want to kill myself over nailing the shadows and lighting every panel if I still have dozens of pages to go.
(That isn’t to say there aren’t a myriad of incredibly rendered comics where every panel isn’t a masterpiece— but if I tried to do that, I suspect I’d still be on page 15 or something. Those sort of projects usually have a separate writer, penciller, inker and colorist.)
What I’m most concerned about is the composition, contrast and clarity. Can a reader tell what’s going on, see what I want them to see, etc? Does it progress the story, establish a scene? Good? Cool.
Instead of doing proper color studies, I usually treat my establishing panel as the color key. Haphazard, sure, and I can hear my old illustration teachers groaning from here, but it saves a lot of time and I’m all about that for a webcomic.
It’s always best to build up a piece from the background forward. There’s a few ways to answer this, but for me, it's simple: everything, depending on distance, fades into the sky color. So, logically, you can reverse build a scene outward starting from the “sky”.

I start at the furthest plane you’d be able to see (the “sky”), add in trees, refine them, and build up my initial color key from there. (Then, I'll sometimes pop over to the foreground to rough in the colors there, and I have two book ends of color to blend toward the middle ground. This particular panel though, I just worked out from the background.)
To save time (again, important!) I made a few Photoshop brushes specifically for leaves/bushes. If you can find something repetitive you draw over and over, seriously, just make a brush. My dumb bush brushes took about 10 minutes to make and have saved me countless hours.
Part 4 - Building Color/Texture
Then, moving outward, I adjust the colors on the various layers, fleshing in the shadows and mid tones, bringing in contrast as the colors get further from the “sky”. This is why I keep everything on separate layers. It makes it really easy to adjust different parts if I need to fiddle with contrast.
In short, further away, muted colors; closer up, sharper differentiated colors.

Part 5 - Shading/Details
The next bit is going in to each “level” of the piece and refining the details. Again, I work from the background out so I can bring colors from the previous plane forward to tie them together.
I also add in character shading and highlights as I go along. This panel took ~6 hours after the characters were blocked in, I think. I listened to a lot of podcasts.

Again, my major concern is clarity. I will gladly sacrifice 100% accurate shadow colors or add in highlights where none should be if it will make the action or characters more legible to a reader.
Part 6 - Coloring Inks/Leveling
Last is easily the MOST tedious, which is coloring the ink lines. It softens the piece and lets the contrast come through, shows me where I need more, etc.
It doesn’t take ages (I think this one was an hour or so to color all the lines) but my god, it feels like an eternity.

I also level out layers to up the contrast if needed. In this case, added some shadow layers on multiply and a "fog" layer with overlay to push the background back a little more.
FINAL:

That panel was probably 7-8 hours of work from start to finish. Most panels are not that complex and average out to 1-3 hours.
If you have any questions, I’m happy to answer them!
Lauri
2019-12-02 09:52:26 +0000 UTCTeagan Gavet
2019-12-02 01:10:10 +0000 UTCTeagan Gavet
2019-12-02 01:09:29 +0000 UTCUrsusArctos
2019-12-01 15:26:25 +0000 UTCRaptorzs
2019-11-29 23:58:28 +0000 UTC