Hello, LoafyLemon here! It's been a while since our last devdump post, hasn't it? Well, life gets in the way sometimes, especially when you're trying to juggle development, art, programming... oh well, you know the drill. But hey, we're back now, and I'm stoked to share some insights into my artistic journey these past few months.

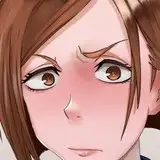
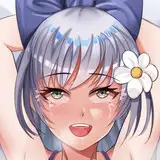
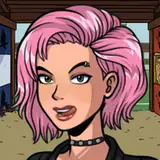
First things first, check out the image above – that's Hermione Granger for ya, chewing gum and looking all sorts of fantastic in her short skirt. Nothing too crazy, just enough to make your pulse race, right? This is going to be featured on the main menu of our game, so gotta make a good impression! Now, let me walk you through the process behind this piece.
When it comes to drawing, I always start with a rough sketch, like the one shown here on the left. You'll notice those arrows pointing in different directions – we call them dynamic guidelines, and they indicate the flow of movement in the pose. It's all about capturing that sense of dynamism, making things look natural and engaging.
Generally, you may notice that certain shapes are only approximate at this stage. This is because I'm a lazy bastard, and I want to get as much done as possible without putting too much effort into details at such an early stage. After all, refining takes time, but there's no need to waste it on something that might not even make it to the final piece later on, right?
This brings us to the lineart phase, which comes next. The sketch serves as a base for cleaning up the outlines and adding more detail to the character's anatomy and features. You can see how I've already started refining her face and body shape here – gotta love those luscious curves! It should be pretty obvious that the face especially has been refined in comparison to its earlier counterpart, although it still isn't perfect by any means, and that's because lineart is all about refinement, not perfection. One of my biggest struggles was always getting noses right, but after some practice, they're starting to look less like squashed triangles and more like actual human snot holes. On top of that, I finally figured out a way to draw hands and feet that don't make me want to pull my hair out, which is fantastic, considering how much time I used to waste on them before.
Now, let's move on to colour testing. This stage involves filling the linework with base colours and experimenting with different colour combinations to see what works best. It's crucial to consider lighting and mood when choosing your palette – gotta set the right tone for that seductive Hermione vibe, right? You can see how I've started adding some depth and shading here, but it's still pretty rough around the edges compared to the final product. One thing I will note, however is that I stopped using the bucket fill tool to colour in areas entirely, instead opting to use the lasso fill tool - this gives me much more control over where the paint goes, which not only means less cleaning up after myself, but also no more annoying colour bleed issues around the edges of the outlines.
And finally, we reach the grand finale: the final piece! Here's where all those previous steps come together – solid colours, cel-shading, and soft shading to create that polished look you see here. But what's this? It doesn't look even remotely like the mess I managed to produce before. Oh, right, let me explain.
In my early days of art, I would spend ages trying to perfect each stroke for the lineart stage, making sure every curve was just right. However, as I progressed, I realized that there's no need to be so damn meticulous with the actual lines themselves if your goal is just to have a good base for colouring in later on. The same goes for colour testing - why bother with multiple shades when you can get away with one and still achieve the desired effect? So, instead of using 2 or 3 different shades per colour, as I used to do previously, I now only use a single shade for each colour – it looks better than ever before, and takes a fraction of the time.
I don't know about you, but I think this has been a massive improvement from where I was a few months ago. Not only did I simplify my process by reducing it to three main steps (solid colours, cel-shading, soft shading), but I also switched over to Clip Studio Paint from PaintTool SAI 2. This switch alone made my life so much easier, especially when it came to colouring and shading. The new software just feels more intuitive and allows me to work faster without sacrificing quality. On top of all that, I found myself a mentor – a fellow artist who's been kind enough to share their wisdom with me. They've been an invaluable resource, helping me refine my techniques and push my skills even further.
Well, there you have it! A glimpse into my artistic journey these past few months. I hope this has been informative, or at least entertaining. Just remember, practice makes progress, and don't be afraid to experiment and find what works best for you. When I started out, I couldn't imagine creating art half as good as this, but with the right tools, techniques, and support, anything is possible.
Until next time, keep on rockin', and stay sexy!