It's been a little while since I've done one of these process deep dives! Of all the illustrations I've done in recent years, this is still one of my favorites, so I want to talk about it a bit.
If you find yourself wanting to know more about the specifics of my techniques, want to know how to perform certain tasks, or just want a couple of tips, consider checking out my lineart post, coloring post, and finishing touches post!
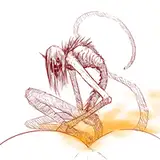
1) The thumbnail, which was drawn in Procreate on a 9.7" iPad. Kaiba has always struck me as a series about connections - the loss of some, the gaining of new ones, and finding your way back to old ones despite everything. In the end, I decided to portray this theme through interlocking hands, both in the foreground and background, as a callback to the opening visuals. I also incorporated the various forms of the main character to imply that he and Neiro were connected throughout everything, and that everything that happened and everyone they met has become a part of them.
I'd originally considered adding more characters, but I thought it would be stronger in concept to use only the two main characters. I'd also briefly considered having plants growing through the gaps between the hands, but I scrapped it for the sake of simplicity.
2) Using Paint Tool Sai, I sketched the background first. Each hand was sketched in a different color on a separate layer to make it easier to edit each one and differentiate between them. I wanted the hands to feel like they were cradling the characters, but also each other.
3) I sketch the characters on their own layer, too. This is what the two sketches look like put together.
4) I also line the hands and characters on separate layers, since I'm not sure what kind of effects I'll want to use just yet. I want to make sure I set myself up to have more options down the line!
5) I line the characters. Here they are by themselves.
6) And here they are together!
7) At this point, I swap to Clip Studio and start flatting. I want the image to have a mixture of warm and cool, but I also want it to feel soft and pleasant, so I end up using mostly pastels.
This is where the separate layers start coming in handy - the ring of light is on its own layer, letting me move it around and edit it. I'll also be able to color the characters and hands without having to worry about messing it up.
The layer order is: Character lineart ---> character colors ---> hand lineart ---> ring of light ---> hand colors.
8) The composition was feeling a little stagnant, and I felt that it could use more motion to help emphasize the action of running in a circle. After thinking it over, I decided to add in the "memories" from the series, since this also works conceptually. I tried to insert them in a gentle swirling motion, and I felt like this helped frame the characters a bit better while also reflection the circular motion/shapes.
9) After getting a second opinion from someone, I decide to change the background to black. I was pretty resistant at first since I wanted the image to feel bright, but I couldn't argue that the black provides much greater contrast. I also sort of liked how it made this feel like "a light within the darkness" or something similar.
10) I wanted there to be some hint of light coming from the ring, but I also didn't want any stark shadows, so I locked the layer opacity and very lightly airbrushed some soft shadows and highlights with the tone scraping brush. Since the light is below them, the shadows are sort of reversed and appear at the top. (You can see this better in the 100% zoom crops at the end of the gallery above.)
I was also finally able to add the overlapping effect to the hands, which I think does a lot for visual interest and makes everything feel much more interconnected, which helps reinforce the over all theme. I did this by locking the hand color layer and following the sketch from earlier to add more colors to the silhouette of each hand. I tried not to stray too far from the core color scheme.
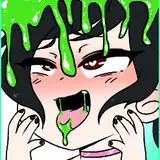
11) This is the most dramatic line coloring I've done in a long time. It completely alters the mood of the whole thing. I was afraid it was too drastic, but in the end I kept it - it sort of makes the whole image glow. This is also one of the brightest color ranges I've used for lines:

12) Some finishing touches! Some are easier to see than others. I added a bit of noise to the background, but most importantly, I thickened the outer lines of the characters because I felt like they were getting a little lost. To do this I duplicated the character lineart layer, recolored the duplication to a slightly darker red, and then used the "correct line width" filter to thicken the lines. However, this affected all of the lines while I only wanted their border to be thicker. Luckily, all I had to do is slip the thickened layer below the color layer, so only the outer edges are visible. And with that, it's finished!

13) Notes on composition: This image is definitely busy, but the path of the "memories" leads your eyes into the ring of characters, which itself reflects the shape of the ring of light beneath them. Everything in the image reinforces a circular motion, which helps it more or less stay cohesive.
14-17) A better look at the colored lines + some 100% zoom crops!
If you have any questions, feel free to leave them below!
Rii Abrego
2023-03-23 05:08:45 +0000 UTCRain Rykiel
2023-03-20 05:35:02 +0000 UTCRii Abrego
2021-12-12 22:08:49 +0000 UTCBuki
2021-12-12 20:41:24 +0000 UTCBuki
2021-12-12 20:38:32 +0000 UTC