My lineart techniques + notes
Added 2021-05-06 19:22:03 +0000 UTCSince I've written a post detailing how I color things, I wanted to make a companion post that details how I approach lineart + additional techniques that I use for different effects!
Drawing
I'm a very particular person, so against my and everyone else's better judgement, I've continued using Paint Tool SAI for my lineart for over a decade. The only reason I continue using it is because I'm so accustomed to the way it feels - if you're trying to choose a program, I 100% recommend Clip Studio instead.
But for the sake of sharing information: I use SAI's brush tool (Spread: 82, Noise: 38). It looks like this up close:

If you're using Clip Studio, any brush with a bit of texture at the edges will work just as well, so definitely check out the asset store! There's tons of good stuff, and a huge amount of it is totally free!
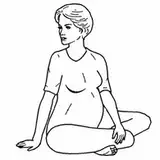
In general, I ink on a separate layer above my sketch, which I usually set to 15%-20% opacity so it doesn't interfere too much:

I try to be quick, since if I become too finicky my lines tend to turn out stiff. If you've ever noticed that my lines have a lot of gaps, those are actually natural breaks where I've picked up my pen for whatever reason - either because I'm taking a split second moment to think where I want to go next, or just because I've reached the end of how far my hand can maintain a steady unbroken line. Instead of starting at the end of the previous line, I skip ahead a little. This gives me a little leeway and saves me a lot of time, because I'm not carefully trying to make the two connect seamlessly!
(Aside note: I like to sketch using a blue airbrush, because I've found that if I use a brush too similar to the one I ink with, I tend to get too precious about lines! An airbrush is so different from my final lines that it helps my mind relax a little, so I can get looser and more spontaneous. I feel like my art has become livelier since I made the switch.)
Coloring the lines
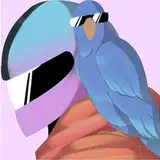
There is so much beautiful art in the world that utilizes solid black lines, and if that is what suits your art best, then by all means, please keep it up! I love it! But with the way I work, coloring the lines is one of the most important steps for achieving the look that I want. When used correctly, it can add so much color, life, and dimension to an image. look how different this would look with solid black lines!

The easiest way to use colored lines is by drawing in black first, then locking the layer opacity - this allows you to color the lines without spilling over the edge or affecting their quality. And if you decide you don't like the color, you can just color over it again! Here's what it looks like to color on a normal lineart layer vs an opacity locked lineart layer, plus where to find the "Lock transparent pixel" button in Clip Studio:

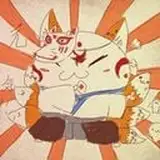
As far as how I choose which lines to color, a lot of it is intuition, but in general I brightly color things that I either want to soften or that I think should recede more. The more I want a line to stand out, the darker it is. As an example: In the image below, black is used for the edges of the rabbits, her arm, her hair, and the ruffled dress collar - these are all the "outer" lines of each of their respective sections, where they overlap something else. Using a black line helps set them apart, helping the viewer more easily read a fairly dense image.

I'll usually document which colors I use in my individual illustration process posts, so keep an eye out for those!
Fiddling around
There are two main things that I like to mess with at the end of an image! The first one is line thickness. No matter what I do, I cannot convince myself to have a heavier hand, even though I like my lines slightly thicker. If I want them just slightly thickened, I'll duplicate the lineart layer, shift it down and to the right by one pixel, and then merge it - this usually does the trick. But if I want the lines thicker than that, I'll use a built in Clip Studio tool: At the top of the program, click "Filter -> Correct drawing line -> Correct line width" and then choose how much you'd like to thicken your lines!
Important note: I usually use a duplicate version of my lineart layer for this, since you can't thin the lines back down without a decline in quality. It's good to have a backup just in case you change your mind! Also, this tool works best at high resolutions - if your canvas is too small, it may thicken your lines too drastically.
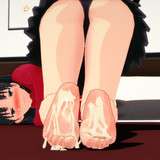
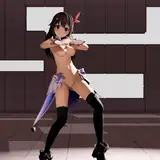
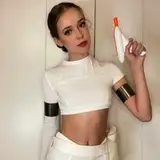
The second thing that I like to do is duplicate my lineart layer, then lock the opacity of the lower layer and color it, usually something warm like red. I then shift the red layer down and to the right by one or two pixels so that it's just barely peeking out from under the original lines. Just in case that's a little confusing, I've included an example below (first is the original lineart, second is the red layer, third is what they look like stacked together). It's most visible in her hair and in the darker purples of her dress. I don't really have a good explanation for why I like this, but I think it's neat.

And that's more or less it! I'll come back and update this if anything else comes to mind.


![Someday*[サムデイ]](https://saketami.com/istorage/107168.jpg)