Brigitte's Gym Breakdown and Animation Insight
Added 2021-09-16 02:53:33 +0000 UTCHello! After finishing such a large project, I feel it's time to do another breakdown and insight. I haven't done these as much lately as I don't want to repeat myself, but there were some new things I learned and refined while working on Brigitte's Gym.

One of the things I focused on with this project was the correct offsetting of keyframes. Surprisingly, I've found little information on this, and I believe it's a HUGELY important part of animation, so I'm going to break down what I've learned.
First off, what do I mean by “offsetting keyframes?” When you block out your animation, all your keyframes are going to be in the same spot (for example, head, neck, shoulders, chest).

Now, the body doesn't move all at once! Either the head moves first, driving the rest of the motion downwards, or the chest/torso moves first, driving the rest of the motion upwards. But, how do we decide which one to use, I.E., do we offset the neck 1 frame forward, the shoulders 2, the chest 3, etc, or do we go the other direction and offset the neck 1 frame backwards, followed by the shoulders 2 frames backwards, etc.
In my time spent animating, I've learned that the solution depends on the motivation of the character. Is the character tired, bored, lazy? Well, then you frequently want the chest to drive the rest of the motion (I.E., use the chest as the basis and offset the neck forward 1, shoulders 2, and head 3). This brings a more lackadaisical motion to the character (the head is the LAST part of the body to reach the focus point)).

If the character is alert, surprised, anxious, then the HEAD will drive the motion (I.E., use the head as the basis and offset the neck backwards 1, shoulders 2, chest 3 (the head is the FIRST part of the body to reach the focus point)).

When animating, you want to put yourself in the head of the character, and use that to drive their motion (body language!). Are they alert? Tired? Angry? Lazy? Motivated? The answer to these questions will also answer which direction to offset your keyframes.
CLICK HERE for the complete video example of what the different methods of offsetting look like!
If you want to take your animation to the next level, you also want to think about offsetting your individual tracks. This is where things get really interesting, and you start getting closer to true, natural motion.
What do I mean by offsetting tracks? Every bone has 6 main tracks, 3 for rotation, and 3 for location (X,Y, and Z). While these can differ depending on the rig, usually the Y is going to be the “twist” (think of shaking your head), the X is going to be the “nod” (think of, well, “nodding” your head), and the “Z” will be the side-to-side motion.
These motions don't happen simultaneously, they happen sequentially. Try twisting your head while also leaning it to the side. Usually, the side-lean is going to complete before the twist, or, the “Z” completes before the “Y” (your head bobs over and the twist comes to a finish a fraction of a second later). You want to duplicate this motion with your keyframes, by offsetting the individual axis.
The easiest way to make these changes is in the graph editor. You can select and visualize an individual axis while also seeing a “ghost” overlay of the other axis while your work (making it easier to keep track of the timing).

If you don't want to spend time polishing every single motion, offsetting the whole Z axis (or whatever axis corresponds to the “side-to-side” bend on your rig), 1 or 2 steps forward, will (in my experience), produce adequate results, and bring you closer to naturalistic motion. Of course, individual polishing of every movement in your animation is recommend, but sometimes you have to run a “cost-benefit” analysis, and choose where to focus your effort.
Note that you shouldn't feel obliged to ALWAYS offset every bone, or every track; there will be situations where having them play at the same time is the right choice, or where you want to offset the head/neck/shoulders, etc, in a group, rather than one at a time. It's not a hard and fast rule, but a guideline.
I hope this is helpful! Let me know if you have any questions about this process as, again, it's somewhat shocking to me that there aren't more resources about this incredibly important step of animation.

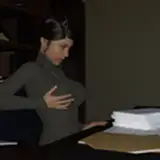
Moving on, I did discover a rather quick method for creating breast keyframes which I'd love to share. The breasts are going to closely follow the movement of the chest, so, instead of trying to manually match this movement, why don't we simply copy the relevant keyframes FROM the chest, and paste them TO the breasts?
First, find which track contains the relevant keyframes. In our case, it's the “Y-Axis.” Copy the Y-Axis keyframes from the chest, and then locate the relevant track on the breast bones. In our case, this is the “X-Axis.” Simply paste these keyframes into the X-Axis track, and then offset 3-4 frames. You will very likely need to do some manual cleanup, but this provides the basis and timing for your breast keyframes, saving you a ton of work, and likely giving you a better end-result.

CLICK HERE To Watch a Video Demonstration of This Process!
This workflow can be repeated for the up/down motion of the breasts, as well (and further, you can copy the rotation keyframes into the location tracks and REALLY get wild with things 😉).
Now, I'm gonna list various tips and tricks I used while working on this project (begin montage!).
Mirrors were a HUGE problem! In Eevee, you can get solid reflections by using a “reflection plane” and a material with a low roughness value. BUT, if you have any lights in the reflection, you get a hugely visible, distracting “halo” around the light. Completely unusable! I tried a bunch of methods to mitigate this, finally settling on disabling the “specular” value of the light. Of course, you want specular in order to create those beautiful rim-highlights on characters (and for general accuracy), so I found myself adjusting my light setups for basically every single shot, to both have lights in the mirror view for general visibility (specular disabled), and lights just out of the mirror view to add those wonderful highlights (specular enabled). A keen eye will notice some issues with lighting continuity in the short, but this was simply a trade-off I had to accept.

You might also notice the mirrors in the background are not reflecting; the mirror reflections in Eevee are a one way street (meaning there are no reflections within reflections... dawg). After fiddling with this for hours, I decided to, again, ere on the side of "visuals" over continuity, and simply moved or disabled mirrors in many shots, replacing them with posters or equipment. A small trade-off when you think of how many days (weeks?) of time Eevee saves in rendering.
Automating as many action as you can (especially for longer sequences) is going to save you a lot of time. In the lat-pull sequence, I set up a driver on the weight stack, so that whenever the bar is pulled down, the weight goes up. This makes iteration easy, as when you need to change the timing, all you have to change is one object (the bar), rather than two (the bar and the weight). This also gave me some realistic motion, as whenever Sombra did little jerks down (half or quarter pulls), the weight would react similarly.

In the squat sequence, locking the bar on one axis was important. I used a “Child-Of” constraint on the barbell, set to the chest bone of Brigitte. This kept the bar in place on her back, but when she squats down, I needed the bar to remain connected to her chest/back, while staying flat on the safeties (can't be having a heavy barbell casually lifting up and down). For this, I used two floor constraints (one set to Z and one to -Z), and animated their influence off/on whenever Brigitte squatted down. These three constraints worked in tandem to keep the barbell moving with Brigitte while staying locked to the safeties.


Also in the squat sequence, I used empties to re-target the pivot point of her hands, so that I could effectively rotate her hands around the bar (this is something you definitely want to integrate into your workflow; it's very common for the pivot of the bone to not match your ideal rotation, so get used to using empties and child-of constraints to temporarily change this pivot point).
This empty is, similarly, attached to the barbell via a child-of constraint (it's child-of constraints all the way down...).

Thanks for reading! Again, if you have any questions, feel free to ask me, either on here or on Discord.
Will be back Saturday with some previews of Ada's new machine. 👀
Talk soon!
Comments
You're awesome, Dorn. Same to you!
BaronStrap
2021-09-16 17:35:59 +0000 UTCThanks, Wunderscore! I'm glad you found some value; the more people making content, the better.
BaronStrap
2021-09-16 17:35:49 +0000 UTCHey Baron, thanks for the insights. I have been hunting through Patreons to try to find behind the scenes stuff, and a lot of creators really don't do that. Lewd content or not it helps a lot. Hopefully I can make something of this caliber myself one day.
Wunderscore
2021-09-16 15:03:20 +0000 UTCI love these. They are absolutely amazing and inspiring. Keep being you, Baron.
Dorn
2021-09-16 14:15:46 +0000 UTCSometimes I can't think about how much work lies before me at the start of a project, and at the end, it's just like "wow, I can't believe I actually did all that!" It really is building blocks, one at a time. Appreciate the kind words, Costa.
BaronStrap
2021-09-16 06:27:09 +0000 UTCI'm glad you enjoyed it, ZA! 🙏
BaronStrap
2021-09-16 06:26:10 +0000 UTCI usually use the feet of the model, and then sculpt some changes and add new textures, so they are technically different, but I'll keep looking to improve!
BaronStrap
2021-09-16 06:24:48 +0000 UTCYour animations are top notch. Have you thought about getting different feet for different characters to diversify abit though?
SpicyMango
2021-09-16 05:46:26 +0000 UTCThat is some serious work right there. I always had a feeling that A LOT of intricate detail, work, fine tuning, etc etc went into animation, but you've shed quite a bit of light on just how much does go into it! And I bet this is barely the tip of the iceberg. Serious respect for your craft.
Costa
2021-09-16 05:36:25 +0000 UTCThis is really cool! It's always nice to see the behind the scenes break downs, especially when you go into the minute details that help overcome some of the issues that break immersion.
Tanis Steele
2021-09-16 04:23:06 +0000 UTC