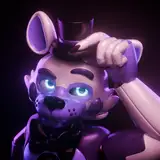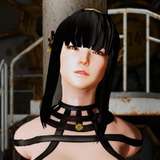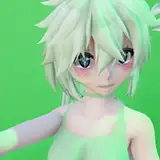
Tifa in the Box Breakdown and Insight
Added 2020-09-18 22:40:18 +0000 UTCThere's something “pure” about these machine animations; just a girl, a machine (in this case, a box) and as many devices as you can conjure up. It's a lot of fun to do, and this one was no different.
Note: look for a link to a higher quality video below relevant gifs. The gif. compression is just... well, it's rough, and there's lots of detail lost, so I think this may help the presentation a bit.
I'll go through the project and find points of interest, expounding on things I think are cool, or challenges that I had. The main focus of this one, from a technical standpoint, was really optimizing my constraint workflow. I found some new techniques and polished up some old ones; overall this was actually the most technically complex animation I've done yet and... I'm just thankful that it worked! In the past I've had to “brute force” some things (in the Jill animation, the little tickle balls had a basic constraint, but they didn't stay in place very well, causing me to go through frame-by-frame and adjusting the position). I want to get away from brute-forcing animations, as... well, it takes a lot of time, time I can be using to polish other aspects of the animation, and usually a smooth constraint system is going to look better on-screen anyway. It's a win-win.
The main thing I've integrated into my workflow is the “vertex parent empty.” Up-til-now I've primarily been using the Child-Of Constraint, which simulates a basic parent-child relationship without actually having to set up that relationship manually, and it also allows you access to a slider wherein you can animate the influence of the relationship (say a character is to pick up a glass of water; you would have the glass on the counter with the Child-Of Constraint keyframed at 0%. When the character's hand moves into position, you keyframe the influence to 100% and voila! A cool refreshing drink).

“Vertex parenting” is different in that there's (unfortunately) no modifier; instead, in edit mode you select 3 vertices, tab back into object mode and select the object you want to parent, shift select the original model, tab BACK into edit mode, hit Ctrl-P and select “Set Vertex Parent” (it sounds so complicated seeing it written out!). Instead of being parented to an individual bone or object, your object is now parented to individual vertices, which is much more granular and (in most cases) accurate.

Video link: https://thumbs.gfycat.com/UnderstatedAllIraniangroundjay-mobile.mp4
Say you want to attach a tickle-hand to the body of, oh, let's say... Tifa! Instead of parenting the hand directly to one of the Tifa-Rig bones, you would first set-up an empty with a vertex-parenting relationship, and then parent the hand to said empty (this allows us to regain the power of animating the influence, letting us turn on/off the parent-child relationship through the Child-Of Constraint).

Video Link: https://thumbs.gfycat.com/PracticalHeartyEmu-mobile.mp4
Powerful stuff!
I put this workflow to the test with the “tummy tickler” robot. 12 empties, vertex-parented to the belly, a curve parented to the empties, and then the IK parented to the curve (using a "Follow-Path" constraint to animate the little ticklers up and down; I go into more detail about the "Follow-Path" workflow in the feet section below).

You can start to see the value of the vertex parenting in this gif; normally, I would have run into issues with the “breath” shapekeys, as these are not normally taken into account when parenting to bones. With vertex-parenting, the shapekeys are now affecting the movement of the empties (staying stuck to the tummy and following the breath in the gif. above). Hugely beneficial!
Enough about tummy, let's talk about feet.

I knew I wanted fourteen individual feet ticklers working away on poor 'lil Tifa's soles, which meant I needed to find a way to automate this process. If I'd had a couple ticklers, I could get away with brute-forcing it, but there was no way I was going to do that with fourteen, so I had to find a way to keep the ticklers attached to Tifa's feet in real-time, even if I needed to change the animation during the polish phase.
I made a curve following the general paths I wanted the ticklers to follow. One main one running up and down her feet, a few on the sides, and three on top. I then used a shrinkwrap modifier to “stick” these curves to her feet. I applied the Shrinkwrap and then used a Child-Of-Constraint on the curves to stick them to the feet. I then made an empty and used a “follow-path” constraint, allowing me to animate this empty along the length of the curve.
Finally, after making a basic IK rig for the foot ticklers, I parented the IK Controller to this empty. Now, all I had to do to animate the motion of the tickler was animate the percentage value on the follow-path constraint. It worked perfectly!

Then, rinse and repeat fourteen times!
I wanted to add some more motion to let people “feel” the complexity of this box; the more little things moving the better. To do this, I decided to add some movement to the gears at the base of the ticklers. I used a "Copy Rotation" constraint, disabling all of the axis save for one, the Y-Axis. I feel like little things like this are what makes the animation; subtle details that, even if you don't directly notice it, you “feel” it in the overall effect.

What do we call this device? I was just calling it, well, a “Pussy Tickler”, but I feel like there has to be a more elegant name for it.

I can use this device to show the power of modifiers. There are some 48 nubs on this thing, moving in and out to stimulate the nether regions of our girl. Obviously, animating 48 nubs is something I wanted to avoid, so using a mirror and array modifier, I was able to create instances of 4 nubs and run them around the length of the device. Then, using four shapekeys and offsetting their animation, we get a nice “vibrating” effect.

Video link: https://thumbs.gfycat.com/LinedLinearAntelope-mobile.mp4
Lighting is always important, if not THE most important aspect in establishing a mood. My method is usually setting up a basic three-point light system (research that term if you're a creator; it's the bread and butter!) and then I “paint” with extra lights. Splash of red here, splash of color here.

The only difference between these two pictures is a single, well placed light!
I wanted some nice reflections to run up the inner thighs of Tifa's legs. Stuff like this plays into psychology, and I think it's important to dig into. The light is a “guideline” and we read visual scenes in a symbolic way; the light on her inner thigh is “guiding” you visually to her reproductive areas (I.E., her puci); it's a marker, it's symbology. It perhaps sounds facetious but it's important stuff to think about when trying to set a mood, and will give you a foundation as to how to structure your light setups.
Please feel free to ask me any questions, in the comments here or on Discord! I'm still learning everyday, but I love talking shop with fellow creators, or just people who are interested in the process.

I have some new stuff going up soon, so be on the lookout.
As always, I hope you're doing safe and well! Talk soon.
Comments
Thanks, Dragon! I know it's it's somewhat scattershot as there's so much to go over, so feel free to let me know if you have any specific questions.
BaronStrap
2020-10-02 09:50:12 +0000 UTCI joined your Patreon just so I could read this blog post and it was totally worth it. Really interesting breakdown of an inspiringly complex piece of work.
Papa Dragon
2020-10-01 08:29:45 +0000 UTCAppreciate you watching it! 🙌
BaronStrap
2020-09-20 09:59:20 +0000 UTCThis detailed write-up is awesome and really resulted in a absolutely wonderful end product. Thank you again for giving such amazing work!
JC
2020-09-18 22:42:34 +0000 UTC