Hello and glad Monday!
Today I thought I could share a more easy overview of how i make my backgrounds, or the process of it, as it is of course a bit different each time depending on what kind of background i make.
How I make my backgrounds is a bit of the same process as how look/find the best backdrops/backgrounds when I take my pictures while shooting actually.
1. Have an idea before you start
You don't have to have the complete final background in your head before you start (it can even bite you back if you feel like you can't create it in the end), but at least have something you know you want in it. Maybe you want it to be in the woods? Maybe a specific area in the the game? A specific vibe? Or just a specific color or object you have in mind that you would like to include.
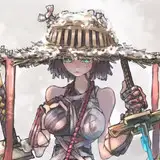
But if you feel more comfortable to start with a bit more structure (as for some might the "just go with the flow" feel a bit stressful and such a big task), so could you also draw a messy sketch of what you have in mind. Like I did with this one:

Something I'm trying to dig more into as it can be very helpful as well!
But with this background I'm making now did I already knew I wanted to do something coastal, and I for reason had the Moorland beach in my head. So I had that as a starting point.
2. Go ham in game with taking photos
As long as your storage allows it, just take photos of everything you can think "Maybe i can use that?". You can always delete the photos you did not end up using.
Take photos of the scenery you might want to use, objects you might want to add. That rock? Yeah take photos of it too! Travel around to every part of the map you know might have the stuff you are looking for.
3. Start with putting in the very basic
The very basic can of course be different depending on what type of background you make. But let's say you want to create a completely new background, then a foreground, a middleground and a sky/the part furthest away, can be a good rule to go after.

Just cut it out very loosely and paste it in where you kind of want it. After you feel
like "Yes this can work", clean up the parts

4. Paste in objects you want to include - aka decorating time
Start off with basically the same as the previous step, just cut it out very loosely and paste it in where you kind of want it. After you feel like "Yes this can work", clean up the parts.
This is a bit of a "just keep trying" to see what you want to include or not. It might sound a bit boring to hear, but i think it partly is an "eye" you need to train. What you think will look good in the end and fit your style. So to completely to say what to include or not is hard. But a few tips would be:
- Not to include too many different colors. It can create a somewhat messy background as well as it can be hard to know where to look.
- Try to not have a too messy background exactly behind your subject, if you are not blurring the background a lot. Because then it doesn't matter too much as everything will be blurry. You want your subject to stand out just enough and not merge too much with what's behind.
- This is not something I did in this background, but I kind of did it in the example in the first step, and that is to put things in the foreground and make it more blurry, aka closest to the lense if it would be a camera taking a photo. This can help create depth in your work and make it a bit more unique.


5. Keep going if you want to work more with details
Because you could technically stop here, especially if you will blur it. But it always gives that little extra to add more details. Like shadows, change colors of things, add light etc. But if you feel a bit unsure with light, change colors etc can just adding a faint shadow under objects give a lot to a background! There's different ways to make shadows, but one way is to duplicate the subject/object, flip it upside down, fill it with black, blur it and change the opacity.


6. Now, just blur it, if you want to
I always blur my backgrounds, i like it like that when i take photos irl as well. It makes it more clean if i'm having a specific subject/object as the main focus.
In my edits I always leaves a bit unblurred at the front, or where the subject that should be in focus is standing. But, this is all up to your own preferences.


So there it is! I'll included them in a public post so you can download and use them in your edits if you want to. I'll also add a version where I changed the sky. Which could be a quick tutorial for another time.
Hugs ❤


![[ ʜʏᴇɴᴀ ʙᴇᴡɪʟᴅᴇʀᴇᴅ ]](https://saketami.com/istorage/110963.jpg)