Shading and highlighting can for sure be difficult, especially if you yet haven't found the right technique that suits you the best. It's easy to jump to the short cut by using the smudging tool to blend the colors together, but in my own personal opinion, smudging is not always the best tool to use, especially if you want to accomplish a realistic result. The color picking technique sure is time consuming, but Rome wasn't built in a day, right?
I have always used the color picking technique when blending colors together, and in this step-by-step tutorial I will show and tell you how.
You will also be provided with the shading brush I always use, and it's of course for free! This brush is made for Photoshop, but it also works in Procreate 5 and Gimp. If you use another program than any of these three, please let me know and I'll try to figure out how and if you can transfer it to your program!
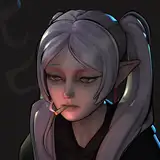
The first thing you need to do is to find a good quality reference. This is very important so that you can see the shades, highlights, muscles, anatomy and proportions clearly.

Step one: The first thing you need to do is to start picking out the right colors. Shades aren't always black and highlights are not always white. Start off with the shading. Pick up a dark color and turn it even darker, and start to draw (on a separate layer) where the shades should be according to the reference. Your brush should be on 50% opacity.
Do the exact same thing with the highlights. Pick up colors and make the colors lighter, and draw where the highlights should be. Be gentle on the hand, we don't want too harsh strokes!

Step two: Color picking! Blend the colors together by color picking around the transitions. This is a step that's repeated several times until the transitions are smooth. This is without doubt the step that takes the longes amount of time, but I promise it's worth it!

Step three: To make the muscles and highlights more defined, add another layer and draw an even lighter color, but with a smaller brush (still 50% opacity). This makes the highlights and muscles "pop" more.

Step four: another step of color picking, repeat step two, but use a small brush so the lightest areas doesn't blend too much with the rest

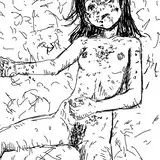
Step five: Adding small, realistic details are in my opinion super important to make a drawing come to life. Here I have added veins on a separate layer, still using the same brush with the same opacity. First I added the darker shade, and then on top of that I added highlights.

Step six: Again with the color picking! Are you tired yet? That's fine cause that was the last and final step! A quick tip for this step is; if you think the veins look too dominant even after color picking, try to turn the opacity on the layer down a bit until you're satisfied with the visibility!

After playing around with the contrast and lighting, here you have the before and after! Voila!
Hope you found this little tutorial helpful, and feel free to share some progress pictures in our discord/instagram chat if you decide to use this technique!
And don't forget to save the brush file down below!
Any questions? Let me know!
Hugs from Cath ❤️