Hello!
I've recently been really loving using my P. Cezanne colored pencils with the Legion Stonehenge White paper and experimenting with mixing colors and textures. I've been loving Chris Hong's colored pencil work, as well as Bao Pham's, so if you're looking for inspiration, I recommend them!
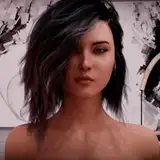
For this walkthrough, I want to share how I built up deep, curly hair to have dimension!

Starting off with a medium deep, chocolatey brown pencil, I draw soft, circular strokes as a base. I'm holding up the pencil so you can see what the tip looks like; I like for it to be really flat at this stage so that when I apply the first layer, it deposits very soft and light. Using the warm brown also will help develop colors and layers as you keep building.

This is what the first layer looks like after I finish it. I also have the color denser as it's closer to the head, and fade it out a bit as it would naturally thin out.

Next, I go in with a darker brown (like a dark chocolate/burnt umber shade) and use the same circular motions to deepen the color. I press a little harder (not gentle but still not saturating the paper with color), and keep the pencil *relatively" sharp. I wouldn't recommend constantly sharpening to a point, but it should be sharper than the first layer's pencil. Same technique as before, just a little harder and sharper!

This is what the second layer looks like after it's finished! Definitely not as deep as we want to go, but slowly building layers!

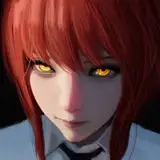
Next pencil color is an even darker brown (basically the brown before a black). Same as before, small circular motions. By this point, you'll have to be pressing down a lot harder than the first two layers to be able to see the pigment showing through, but don't apply max pressure just yet. At this point, be selective with how saturated you're applying the pencil; take bigger sections of hair and curls in mind, and try to shade around them as if there are shadows and highlights. As before, apply softer pressure around the ends and sections where the hair is less dense.

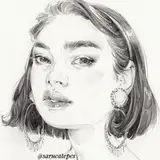
Finally time for the black colored pencil! Here you'll be applying the darkest sections, so be selective with what you color in darkest and which parts you let the brown peek through. if you look at how I shaded the front section, you can see I tried to create a gradient of black to brown dependant on the density of the hair. Make sure that you add loose baby hairs and stray pieces to break up the mass of the hair's shape!

And this is the finished product! I believe I used an orange or burnt sienna shade of colored pencil around the ends to make them appear more glowy and fluffy, so feel free to do the same!
Hopefully, this was useful to see my layering process! You can add different shades or colors depending on your desired end result; for example, if you want to do pink or red, think about what undertones you want to see in the hair and start off with those! Lastly, I've learned to use bright, saturated pigments when I want to layer this way. If you want to draw pink hair for example, I recommend maybe using an orange or bright pink lightly as the first layer rather than a baby pink. Stay away from colors that have an added white pigment to them when you want to layer!